
The first thing that I finally finished was the baby sling. I didn't have a baby sling with my first child and I was remembering my tired arms from carrying him when he was really little, so I thought a sling might be a good investment. I found this free pattern online, which incidentally was pretty much identical to one of the slings that I found in a boutique for close to $70. The pattern was easy to make, I ran into a few snags because I made it reversible and I tried to make a few short cuts. Take my advice, no short cuts when sewing!!! But other than that it was easy. I will say that it was difficult to find the size that fit me the best. I made a few practice slings out of some extra cheap fabric that I had, to get the perfect size before I used my good fabric. It was also hard to judge the size because I don't have an infant that I can take for a test run and I also have a large belly in my way :-) I made the final sling with Amy Butler fabric and so far I really like how it turned out. I will find out in a few short months how it works and I will let you know.
 The next thing that I worked on was another baby blanket. I knitted one for my first child by using 2 different colors simultaneously to create a variegated effect and I knitted it in a seed stitch. I wanted this blanket to be similar but different and I stumbled on this pattern ... so I made it. It was VERY easy to make; it was simple crochet using 3 different colors at the same time with a size 35 crochet hook (or what they call a speed hook). The only adjustment I made was the size; the pattern called for 6 skeins and I used 9 in order to get a similar size to the one I made for my fist child. I really like how thick the blanket is... this will be a winter baby and I think a heavier blanket is going to come in handy.
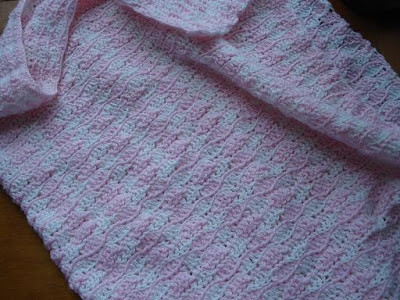
 I have a cousin that was due last week with her first child that is supposed to be a girl. So, I wanted to make her a blanket as well. Luckily I had a pink and white baby blanket that was almost done just laying around the house. A few years ago I had a friend that told me she was pregnant and I immediately thought that she was having a girl, so I started crocheting her a blanket. Right after I finished crocheting it she had her sonogram that proved me wrong and the blanket has been laying around here ever since. I decided to tuck in all the ends and get it ready to send to my cousin. It was lucky that I had that left over, otherwise I don't think I would have had the time to make her one.
 I would also like to knit my cousin a small stuffed toy to send with her blanket. I made the reversible dolls for her brother's twins earlier this year, and I think it would be nice to send her something little too. The dolls take me way too much time (which I don't have right now) sooo I found this pattern for a small knitted bear. I haven't even started on this yet, but it looks like it will go pretty fast and I have plenty of yarn at the house so I won't have to go buy any. I haven't heard if she had her baby yet or not... so I still might have a little time to get it done.
  Another project that I would like to get done in the next week or so is an organizer for all of my knitting needles and crochet hooks. I usually keep them in my Grandma's old knitting bag, but it is hard to locate specific sizes. So last night I drew out a plan for an organizer that will hang from the wall or can be folded and rolled like most knitting needle organizers. It is going to be pretty large but very easy to sew. Hopefully I can get this done in the next week or 2 and post a picture of the final result.
 Since I have been looking for projects to complete around the house, I finally got my granny square afghan done!!!! I am glad to finally have it done, but I was a little disappointed by the size. It is much smaller then I thought, but I figure someday when I am really bored I can get some more yarn to make more squares and super-size it.
 What else? Oh, so last week I got sucked into the "Twilight" book series by Stephanie Meyer. Each book has a bout 500-600 pages and I read all 4 in 5 days!!!! Since I am not a teenage girl and I have a firm grasp on reality, I felt a bit strange reading this series..... but Meyer seems to have a way to keep you reading right up till the end. The series was getting a lot of good reviews and all 4 books are on most Bestseller lists, so I figure it was definitely worth checking out. After having this intense need to read for 5 days, when I was done reading I felt extremely bored. I decided that I needed a new project to keep me busy so I didn't pick up another book that consumed my ever free minute. I then found this pattern for a shrug. I have been wanting to knit a shrug for a while and I thought that this was the perfect time to do it. All of my maternity clothes are for the summer... and since the shrug doesn't extend to the belly, I thought that I can get away with wearing this before and after the baby gets here. I am not quite done with it, but it is getting there. The pattern is fairly easy and straightforward and I am definitely refining some of my knitting skills like picking up and knitting stitches. :-) I will show the finished result when I get that done.
 I also made some thank you cards from my son's birthday. Elsie Flannigan had a few baby pics that she posted on her blog a while back that I used as inspiration. She took the pics of the baby on a large round hay bale and I got an idea. I hooked up with a friend of mine and we took the kids to her dad's farm, where low and behold... he had some round hay bales. Well, anyway here is how they turned out:
Front:
 Inside:
 I think that covers all of the things that I have been up to lately (as if that's not enough). Now my brain is going crazy thinking about the things that I need to get done before the baby comes like.... make my son's Halloween costume, make the birth announcements (as much as I possible can at this point), make my Christmas cards so that all I have to do is add the picture and sign them, get a few things made for my cousin that is due at the same time as I am, and that doesn't include getting ready for the baby. Hopefully I can get some of those things done really soon so that I have more time to rest before I don't have the luxury of resting :-)


 I know that displaying my figurines in a box isn't that creative, but I am really excited that I was able to display them for free. Who isn't excited about the word Free??
 I am not sure what their technical term is but they are party favors (I assume for a kid's party) and they are plastic cones with a textured piece of clear plastic at the end. So you can look through them and see the world in different forms of distortion. I received these as a favor for a bachelorette party that I recently attended and immediately put them up to my camera to see if it would focus through them. And indeed it did. I should also mention that I was using a "pocket sized" digital camera (Sony Cyber-shot) with the front lens measuring about 1/2" in diameter. I don't think it would work with a large camera lens, but it would be fun to experiment. Here are some fun pics of the 2 different "lenses".
 So, like a big dork, I am going to be looking for more of these so that I can really play with my pics. And I am definitely going to keep these in my camera bag for all occasions.
 So I decided to hang it next to my "Jewelry Box". I also found this frame at a garage sale and it was just a frame; no glass and no picture. It looked like it was made in the 70s and although it was made out of wood, it was painted to look like a more expensive and interesting wood (you know, with painted on wood grain). There was also a part of the frame that was covered in a faux suede that accentuated it's 70s-ness. I think I bought it for $5? and I painted it in a high gloss black and covered the fabric section with a zebra print fabric that I just had laying around the house. Then I had my husband build a shallow box behind it and hinge it to the frame. I cut a piece of Styrofoam to fit the inside, covered it with black fabric and placed it inside. For less than $10 I have a great display for my jewelry and even though it looks like a piece of art on my wall, it is also functional because the frame opens like a door on the front. :-) I used dress maker pins to hang up each of the pieces of jewelry and I LOVE IT. I made this long before I found that mirror and when I saw the mirror, I thought that it would be a perfect addition to my wall... which I am just starting to realize is exclusively yard sale finds.
 But, when I hung my mirror, these photo frames weren't quite working. I remember seeing a DIY "recipe" for an earring holder made from a frame, screw eyes and wire. So I changed one of my frames into an earring holder and I really like how it turned out. I used what I had... the screw eyes were too large and the wire I used was a scrap piece of heavy duty picture wire, but I like how it gives more of an industrial look. The frame is small so it doesn't hold a lot of earrings, but I don't change my earrings that often so this size works perfect for my small collection.
 I like how all the pieces look together and I am itching to find some more functional ways to transform the 3 other small frames.
 I was also thinking about making either earrings or a bracelet to go with this. I don't normally wear bracelets, so I thought earrings. I can't decided between the one on the left and the one on the right. But now I am thinking that the earrings might be a little much?? I am probably thinking about this way too much!


 I also made a cake today. I felt like some chocolate and found the first recipe that I could that had chocolate in it. It is a Kraft recipe called

 While I was knitting the dolls I decided to watch my entire collection of Harry Potter DVDs (during nap time of course). And that is when I saw Mrs. Weasley wearing the coolest sleeves on her housecoat.
 I searched the Internet for a pattern for the sleeves and I found them in this book:


