
Materials:

Yarn- can use a single yarn or multiple yarns. There is not a lot of yarn used in this pattern, so you can use scraps. (The yarn used for this tutorial is Noro Retro in the color 9-Hot Pink.)
Crochet Hook- The size is going to depend on the yarn that you are using, use the size recommended for your yarn. (The size hook used for this tutorial is F5/3.75mm.)
Embellishments- A variety of beads, buttons, pendants, old clip on earrings... anything that can be sewn on as focal points in your 'pinwheels'.
Chain- a heavy-er weight chain is best with medium size links. You can also use ribbon, cording or anything similar to substitute for the chain.
Jump Rings
Clasp
Fabric (optional)- A soft-to-the-touch/silk-ish fabric in a matching or contrasting color. Although optional, I highly recommend it.
Thread
You will also need basic sewing and jewelry tools and notions.
Basic Pattern:
Step1: Crochet a variety of pinwheels, leaving 6"-8" tails for sewing.
Step 2: After finding a pleasing arrangement, sew your crocheted pinwheels together using some of your left over tails with a darning needle.
Step 3: After picking your embellishments, sew them onto the pinwheels in the center using your remaining tails and your darning needle. If necessary, sew embellishments on with sewing thread and a sewing needle.
Step 4: If their are any remaining tails, fasten them and cut off any remaining length.
Step 5: Cut a piece of fabric about the same shape as your configuration with an additional 2" on all sides.
Step 6: With wrong sides together, pin the fabric to the back of your configuration. Sew the fabric onto the back of your pinwheel configuration using a sewing needle and matching thread. Tuck in the raw ends of your fabric as you go along.
Step 7: Using a jump ring or a link of the chain (if chain links are not soldered), attach the chain onto each side of your pinwheel configuration. (If you are using a ribbon or something similar, just attach a jump ring to each side to tie your ribbon onto)
Step 8: Attach a clasp and your are done!
Long Winded Tutorial :-)
Before we start, here is the crochet abbreviations that I am using:
Ch: chain stitch
SlSt: slip stitch
Sc: single crochet
Hdc: Half Double Crochet
Dc: Double Crochet
St: Stitch
Sts: Stitches
Here are the patterns for the pinwheels that are used in this necklace. These are usually the circle bases for granny squares, crocheted hats and pretty much anything crocheted in the round. These are just examples of the pinwheels that I used in this sample necklace, but this is fully customizable. You can get as fancy and elaborate as you want. I used a variety to add interest and texture.
Note: leave 6-8" tails and don't tuck them in because we are going to use them later to sew each together and to sew on the embellishments.
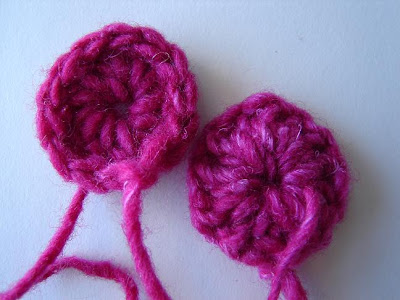
Pinwheel A:
Round 1: Ch 4, SlSt in first Ch made to create a circle.
Round 2: Ch 3, DC 10 or so into the circle to fill the circle. SlSt into the last chain of the (Ch3). Fasten off. (note: the number of DC will depend on the yarn that you use. If you are using a stretchy yarn, you will most likely need more DC to fill the circle. You need enough to fill and complete the circle and the more you have, the thicker and more sturdy the pinwheel will be.)
TIP: the above picture shows Pinwheel A from the right side (on the left of the picture) and the wrong side (on the right of the pic). This is important to note because it doesn't matter which side you use for your pinwheels!! Which ever side you want to use is up to you, you can even use a variety of the same pinwheel, some on the wrong size, some of the right size to appear different.

Pinwheel B:
Round1: Ch 4, SlSt in first Ch made to create a circle.
Round2: Follow this pattern until you obtain the desired size: Sc into 1st Ch St, Ch1, Sc into the very next Ch St, Ch 1.... Fasten off when desired size has been reached. (note: you are putting a Ch St in between each Sc so that this circle will lay flat. Also, you can Sc into the back loop, the front loop or both and it will change the look of the pinwheel depending on which you pick. The pinwheel shown in the picture is made by Sc into the back loops. This pinwheel will look more like a spiral then a circle)

Pinwheel C:
Round 1: [same as pinwheel A]
Round 2: [same as pinwheel A]
Round 3: Ch3, 2 DC into all of the following sts. SlSt into the last Ch in the (Ch3), fasten off.

Pinwheel D:
Round 1: [same as pinwheel A]
Round 2: [same as pinwheel A]
Round 3: 2 Sc into all of the following sts, using front loops.
Round 4: 2 Hdc into all of the following sts, using front loops. Fasten off

Crochet a variety of pinwheels (their are dozens of ways to do this. Use the patterns above or find your own unique twist on them). The sample necklace was made with 3 of pinwheel A, 2 of pinwheel B, and 1 each of Pinwheel C&D. I always follow the rule of Odds, where groups of odd numbers always look best, but you can use as many or as few as you like. Play around with different configurations until you find the one that is most pleasing to you. You can stack them and definitely overlap them.

Once you have found the arrangement that you want, start sewing them together. I usually start by sewing the stacked pinwheels together 1st. Use your reserved tails and a darning needle when sewing these together. Sew all of your stitches onto the backside of your pinwheels

Fasten off by knotting the yarn on the backside of your pinwheels and cut the tail that you used.

After you sew the stacked pinwheels together, use some of your other reserved tails to sew each pinwheel to the pinwheel next to it. Keep your stitches on the backside or wrong size of your pinwheels. If your pinwheels are touching more than one other pinwheel, then sew them to both where they touch or overlap.

Now you are ready to embellish!!! Play around with your findings until you are pleased with how they look. I tend to gravitate more toward the vintage buttons and vintage clip on earrings. You can use just about anything for this step as long as it has the ability to be sewn on.

Once you have decided on your embellishments, now it is time to attach them.

You can sew them on with any of the tails leftover and a darning needle, but you might have to use the matching thread and a sewing needle and sometimes a beading needle depending on how small the openings are on your findings. I recommend doubling your thread for strength. Another thing to mention is that you don't have to use embellishments, sometimes adding a pinwheel in a contrasting color will look great. You also don't have to put embellishments on every pinwheel. Play around with it and customize this as much as you want. You can also sew in tiny beads around the pinwheels too!!!


To attach clip on earrings, I usually poke the earring back though the center of the pinwheel and fasten the clip or screw to the earring. You could sew it into place, but I like having the option to change them out.
At this point, tuck in and fasten any remaining tails.

Sewing on fabric to the back is completely optional but I highly recommend this for 2 reasons. 1.For comfort, you don't have to worry about your yarn being itchy because the fabric will provide a barrier between the yarn and your skin... and 2. For support. By having the fabric sewn onto the back, it will restrict the stretching that will naturally happen with the pinwheels since they are crocheted and made out of yarn. Your original structure will remain more intact then if you were not to sew on the backing fabric.

Step 1: Lay the fabric with the wrong side up and place your pinwheel configuration face up.
Step 2: Cut the fabric in the basic shape of your pinwheel configuration, with about 2 extra inches on each side. Don't worry about perfection here!

Step 3: With wrong sizes together and using dress maker's pins, Pin the fabric to the pinwheel configuration, making sure not to stretch the pinwheels so that the original shape remains intact.


Step 4: With a sewing needle and matching thread, sew the fabric to the pinwheels a little bit at a time, folding under the fabric as you go along. Stay about 1/4" from the edge so that you have enough room attach your chain. I use a whip stitch and no one is going to see it when you are wearing it so don't worry about being perfect.


If you have a tight space between 2 pinwheels, you can cut the fabric in the center to make it easier to sew.

This is about what is should look like when you are done sewing.
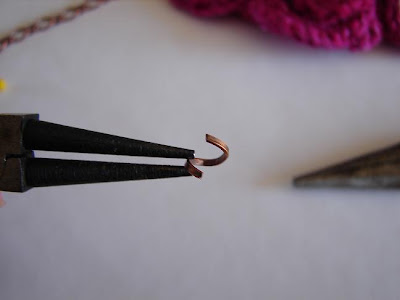
Using a jump ring (or link of your chain if it is not soldered), Open the jump ring and attach it to the upper corner of one of the sides on your pinwheel configuration.

Keep the jump ring open and thread your chain onto the same jump ring and then close the jump ring. (if you are using ribbon or something similar instead of chain, then just attach the jump ring to tie the ribbon onto)
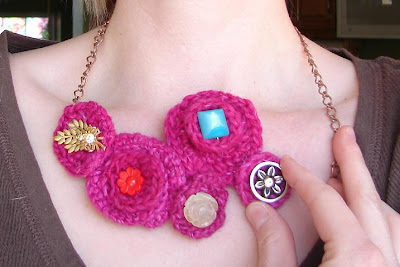
At this point you will need to determine what length you would like your necklace at by trying it on. Make this measurement the longest you will wear the necklace because it will be adjustable if you are using the suggested heavy weight chain with medium sized links. (If using ribbon you will need to allot for the knot or bow tied in the back.)

Attach the other side of the chain to the other corner of the pinwheel configuration.

Separate the chain in the center and attach a jump ring and clasp.

DONE!!!! WoooHooo!!!!
I hope that this was helpful (and not just long winded). Please please please... contact me if anything in this tutorial was unclear and I will make needed corrections and explanations!!! Also contact me if you have ANY questions. Thanks a bunch, Cortney.


 Jewelry:


 The only complicated part of this pattern is that the colors are knitted in intarsia, which means that I change colors while knitting. Not really complicated, but it definitely can be frustrating since I was working constantly with 5 balls of yarn. It was knit in stockinette stitch, so the rest of it was really easy. I had to sew up the side seams, which is not my favorite thing to do, but luckily the patterns has you pick up and knit on the sleeves, instead of knitting them separately and sewing them on. Anyway, I am really happy with how it turned out! I do wish that it was a bit more fitted... especially around the waist. I think if I were to re make this, I would make it a little tighter around the waist. I think because of the fact that it is knitted and long, it really pulls on the piece and gives me more of a rectangular shape. However, I am still really happy with it!


 This next one was knitted for my other cousin's wife. She has bangs so instead of a hat, I knitted her a head band to keep her ears warm, which I think she might also appreciate since she likes to ski. The fingerless gloves here were also really easy and knitted in the round.


 For the boys I knitted them the following 2 hats. Basically a 2x2 rib pattern knitted in the round. The decreases were a little different than a basic hat, so that the ribs stayed intact until the last possible minute. Although I had a pattern that I used for the decreases, I had to alter the size based on the yarn. I picked out 2 SUPER chunky yarns, one more so than the other, so I had to use a different amount of stitches to obtain the right size. I used the same size needle for both and they look great. (oh and thanks to my BFF, Bradley for modeling the hats... my husband would have never gone for that!!)


 I also knitted a hat for my son. We saw this monster hat on

 I also crocheted these ornaments for everyone. They were SUPER simple and easy to make, and best of all it was a free pattern (called Fancy Ornament) from
  I also crocheted a lingerie bag for my friend, Emily's, birthday. So far I only have progress pics because I failed to get any after it was completed/before I gave it to her. So... thankfully she is taking some for me to post. Here are the progress pictures.
 My next post is going to be exclusively jewelry so be on the lookout for that. Right now I am working on nothing but cleaning my house and hopefully some fun projects after that. Here are some things that I am inspired by/thinking of making (Click on pictures for sources):


