Wednesday, August 11, 2010

Quilt

My latest venture: quilting. Here is the 1st one, it took me about a week to piece together and quilt. I kept the pieces simple and rectangular and I only quilted a few of the pieces just for function. I used old sheets for the batting so that it would be "green" and also washable. I enjoyed doing this and I am definitely going to make more!


Wednesday, July 28, 2010

Inspiration

Here are some of the things that are inspiring me lately. (click on the images for links)


Monday, July 12, 2010

Recent Things

Here are a few things that I have made recently:

My Sister-in-law had a new baby. Her 1st was a girl and I made a slightly modified version of Amy Butler's Nappy Bag in PINK.
Well, the new baby was a boy (Max) and she couldn't carry around a pink diaper bag, so I made her another slightly modified version of Amy Butler's Nappy Bag. I use my Nappy Bag even when there are no nappies in there so I try to make them look more like a purse and less like a diaper bag so they can actually be functional even after the kids are bigger. Here is what I came up with. The "leaves" on the front are hand appliqued with some embroidery on the top.I also wanted to make a smaller purse for her daughter, Chloe, so that she could match mom so I drew out a pattern for a nappy bag that was half the size of the other. I machine sewed in the appliques and the embroidery except when I personalized hers... I did that by hand :-)And I couldn't leave out Max, so I made this crocheted stacking toy that was a free pattern on Lion Brand's website. I sewed the frogs eyes on a little weird, but other then that I liked how it turned out. Chloe was playing with it when we went to visit Max, so I think it was a hit.I also made a baby sling for Max to be carried in. I didn't have a sling with my 1st but I did with my 2nd and I LOVED IT!!!! We took a trip to Washington and my 9 month old was in it the entire time. It was great! So that is my new go-to gift for new moms. It was the knitted baby booties, but with all these babies being born in the summer... It thought that I should go with something else. The sling is fitted and reversible and matches the nappy bag that I made her.
So... I have put myself on a spending freeze!!! I have done it before and didn't stick to, but this time I'm determined. I have so many unfinished projects and multitudes of craft supplies, that I really need to use what I have so I have decided to evoke the "poverty breeds ingenuity" initiative and so far this is what I have come up with.

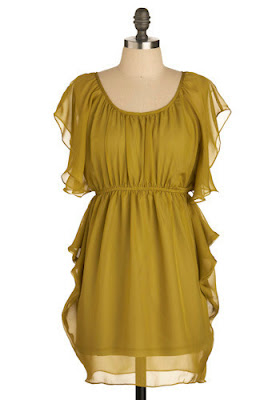
I have a dress that I bought on sale a while ago that is really cute and very comfortable but I have never worn it because it is strapless and I have trouble wearing strapless undergarments. So I decided that a small lightweight/summer bolero would be perfect. After much thought I came up with this:
Here is an old Bink 182 t-shirt that I had set aside for my recycled t-shirt laundry basket. I only wore the t-shirt a few times, so it was really like brand new but since I have had the t-shirt since college, it was quite snug. I decided to cut it to shape, redesign the sleeves into a cap sleeve-ish shape and crocheted the all-over trim. Since this was also a functional bolero (used to cover up my bra straps) I didn't want to worry about it sliding off my shoulder so I made a strap for the front that has 2 button holes sewn into it, with the buttons sewn on the inside of the bolero.... so it was optional. I loved how the bolero turned out and the best things about it are 1. it was completely FREE because I used materials that were laying around in my craft room and 2. it was the 1st time I used my button hole maker on my new-ish sewing machine and it was PURE MAGIC!!!!!!

My other "free" piece of clothing wasn't exactly free.... I was at Target a few weeks ago (prior to my spending freeze) and they had a Liberty of London scarf on sale for $3.95. I folded it and held it up to myself and realized that it was big enough to make a skirt out of it. So I did. I initially planned on making it elastic at the top but since I am on a spending freeze and don't have that much elastic laying around, I made it drawstring. I made a channel at the top like I would for making it elastic but in the center front I sewed on another button hole :-) for the drawstring. I could always convert it if I want to in the future but for now, I like it.I also made a few hair clips. This one was made with a piece of left over Dupioni Silk, a piece of left over tulle and an old clip-on earring.This one is actually wool crocheted and felted flowers. I made this to go with my niece's play house that I made, but I didn't end up using them, so I made them into a hair clip :-)I am really into the recycled t-shirt yarn right now so I have been saving a strip (when I cut up the shirts for my laundry basket) for jewelry. Here are a few that I made for necklaces and I just added a brooch to each. The best part is that they are totally versatile because you can wear them without the pins, or with the pins, or with different pins. LOVE IT.


Thursday, June 3, 2010

Printed Fabric

Here is the finished fat quarter. This is exactly what my son drew as an alien. I am pleased with the end result and I can't wait to do more!!

New Stuff

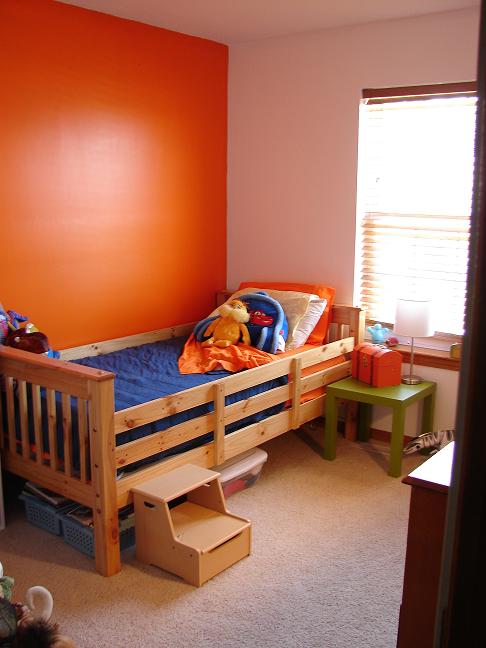
Last Week my husband took my almost-5-year-old to Florida for a short vacation to visit a friend. I decided to take that as an opportunity to redo his room, which was in dire need after the wall decal disaster. They were gone from Tuesday-Saturday and believe it or not, painting this room took me the entire time!!! The room before was a "little boy blue" and the ceiling was a lighter shade of blue (thanks to the previous owner). My son decided he wanted his room his favorite color, orange, and after painting 2 walls orange I quickly saw how bad of an idea it was. The color wasn't the problem, per say, but the orange next to the honey oak trim looked horrendous! I mean it was really bad!!!!! So since my son was expecting orange, I made the executive decision to paint one wall (which happened to not be one of the 2 that I just painted) orange. I picked that wall since it had the least amount of moulding, only a baseboard which would be mostly covered up by his bed. I decided to paint the other 3 bright white. Man it took a full gallon of orange and white to get the job done. Not to mention the several quarts of ceiling paint that it took to make the ceiling white again. There are still a few spots that need to be touched up and the ceiling could use another coat or two, but I am done for now. Here is the result:
I also decided that I would take this opportunity to try my hand at quilting. For the time being I am using the underside of my son's current bedspread until I get his quilt done. Quilting is a part of the craft world that I have yet to venture into. I have been itching to get into it and just needed a reason. I am going to start simple and just make rectangles that will be sewn vertically on the twin side spread. I had a few scraps that would work and now I am collecting fabric for the rest. I saw this baby quilt on the cover of Anna Maria Horner's new book and LOVED how she just threw all kinds of colors in there so this is my inspiration:

I am having trouble finding fabrics in some of the most important colors. I, of course, need orange to tie in the HUGE orange wall that is in his bedroom and his 2nd favorite color is yellow. Both of those colors evidently aren't very popular with the quilters, especially with cute patterns, so I decided to collaborate with my son and print my own. I had him draw some pictures, we picked one of his alien drawings and now I am in the process of printing it on a slightly patterned fat quarter that I purchased. The ink was a little clumpy so I stamped the image onto the fabric and then had to clean it up by painting in the fill. The first round is drying and the next will be the outline. I am excited to see how it turns out.
I am also getting some gifts finished up. I have a crochet project that I am working on, the picture makes it look like a large ottoman, but in reality it is only the size of a butter tub. :-)
And I am finishing up a sewing project. This is the first time that I have attempted applique. I am also embroidering on top of the applique and so far so good. I can't wait to see the final result on this either:
So I am keeping myself pretty busy. Hopefully I will have some completed projects soon to share :-)

Thursday, May 20, 2010

Cutting Paper

Lately I have had this fascination of 'papercuts'. These papercuts are single pieces of paper that have a design cut into it and make a "picture". This has been around for centuries in different countries such as China and Mexico and modern artists have put some really unique spins on the art of papercutting and I completely LOVE IT. Another reason why I like them so much is that they remind me of a one color block print... with a catch. In order to keep the design held completely together everything has to be touching... there can't be any "floating" images or it won't be connected and part of the whole design. Well, this instantly intrigued me and I felt challenged and unbelievably inspired. Here are a few paper cuts from Etsy to give an idea of what I am talking about. Click on the picture of a link to these artist's Etsy sites. Mister Rob is currently my favorite paper cut artist. I think that his designs are really modern and innovative. This one in particular I LOVE.....
...so I used it as a direct inspiration (more accurately: I kinda ripped it off) to make one for my friend, Jess and her man Joe as a thank you for hosting my Chicago trip. I used the same style border and "string" for the letters, but the house is a drawing that I did of their 1st house that they just purchased.

I used an Xacto knife and a piece of black card stock. This is the first one that I have ever done, so it is a little rough around the edges (literally). I was so excited to just jump right in and do it, that I didn't take any precautions against blistering. It took me about 3 hours to cut this out and I ended up giving myself a double blister in the callus region of my middle finger on my right hand. But it was well worth it! :-) And I happened to find a perfect glass sandwich frame that matched their living room furniture!


Blisters aside, I can't wait to do another!!!!

Monday, May 17, 2010

And.... I am back.

I am back from Chicago!!!! I would like to say that I am refreshed, relaxed and ready to tackle the world. Reality: It is still freaking crazy around here. May this year is just insane for me. Hopefully June will be refreshing and relaxing. :-) yeah right!

Here are some of the highlights from Chicago


IKEA: If you live somewhere that has one, then you might not be able to appreciate this. Or you might appreciate this even more. This is the closest Ikea to Kansas City and I was thrilled to go. It was awesome!

We were on our way to Wicker Park, so I decided to look up some "crafty" stores and this was the 1st one we went to and let me tell you.... it was SOOOOO great! I was so in awe that I didn't get any pictures of any part of the store. I will post a picture soon of what I scored.


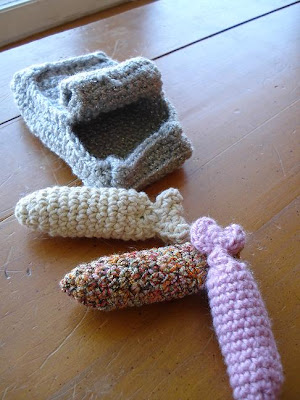
I go to Chicago (not as often as I would like) to visit my girl, Jess (my old roommate from college) and her man, Joe. The shopping and flat tires are just a bonus. But I couldn't come empty handed so I made these really cute toys for their 2 cats: Spike and Maury. This is a free crochet pattern on Lion Brand.com for sardines in a tin can. Precious. I happen to grow cat nip in my herb garden so I quickly dried some and stuffed it in the sardines... along with little jingle bells :-) They were a big hit!
I have TONS more to post about and not enough time to do it right now, soon though... very soon.

Wednesday, May 5, 2010

Ahhhh

This is where I am going until Monday. I hope to get a lot of inspiration and even more pictures!

Tuesday, April 20, 2010

Happy Earth Day!

In honor of Earth Day I am making a laundry basket made out of "T-shirt yarn" that I am making from strips cut out of my old t-shirts. So far a work in progress but I am really excited to see how it turns out. This pattern is called "Save The Tees!" from the book Aware Knits. More to come.... soon!!!


Thursday, April 1, 2010

4 words

DUCT TAPE DRESS FORM!!!!


I finally got the stand built!! (and when I say I, I mean my husband, hehe) We used an 18" round pre-cut piece of pine, a fancy heavy post made for a staircase (not quite 4"x4", but more than 3"x3"), a 1" dowel rod, 4 brackets and 5 casters. We screwed all the pieces together and I hung and stuffed the dress form. I stuffed it with anything I had, left over pieces of fleece, fiber fill, batting. The shape is a little distorted but the measurements are coming out right so I think that once it was stuffed it was bigger front to back then it should have been and a bit shorter side to side. I made it so that it was my height if I were standing on the base, so that I could accurately hem skirts and dresses. I left the neck open in case it needs to be adjusted in the future. I LOVE how it turned out and I can't wait to use it cause I have some BIG plans for some new/up cycled clothes!!! WOOHOO
disclaimer: you will have to excuse the miss match of color of the duct tape. We ran out of the purple while in the making so had to use what we could get... it was pretty great having to ask the neighbor for duct tape and having to explain how I was going to use it :-) luckily he is my BFF :-) Otherwise it would have been even more awkward! Or less depending on how you look at it! :-)

Wednesday, March 17, 2010

Jewelry

Here is some of the jewelry that I have been making lately. Mostly just assembled pieces with a few fabric/ribbon/yarn elements. I have been really big on asymmetry lately. I have a few more things in mind to make but here is a sampling of what I have so far.

The rose in this necklace was made from a strip of Dupioni Silk that I just wrapped in a spiral and hand sewed into place. I sewed it onto a metal ring so that I would have something to link it to.

This was my grandmother's necklace that I kept with the intention of taking it apart and using the pieces for other things. When I finished knitting my 'sweater' it matched perfectly. So I used a piece of wire to attach that big button for a little added interest.

This comes as a free pattern found here. I added the flower and kept 2 of the tails to tie it onto the necklace with a bow in the back. That way it can be removable depending on what I am wearing :-)

The cord on this one is actually made from a recycled t-shirt. I cut a strip horizontally on the t-shirt about 1.5"-2" in width. Then I pulled on it and it rolled up into this cord. That is one unbroken piece that wrapped around my neck 3 times from 1 t-shirt strip. I had this old silver broach that my uncle gave to me for a birthday present when I was like 14? And so I just pinned it on. Also versatile and changeable :-)

I am working on a few more free knitting patterns!!! :-) I had great overwhelming response to the bib necklace so I am just going to keep 'em coming :-) It might take a while, though... I am completely entranced by Diana Gabaldon's Outlander book series. So my time is definitely occupied with that most of the time. But I promise that I will get some of those patterns together!!!