Tuesday, November 8, 2011

Busy

It's been a while, I know....   I have been making a bunch of stuff lately, but the rest of life has been so busy that I haven't had time to post about all that stuff :-)  I actually haven't had time to remember to take pictures of all that stuff either...

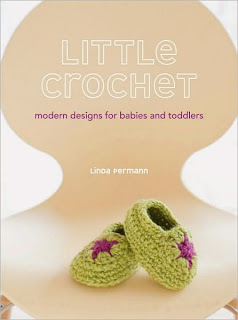
I recently crocheted several sets of baby booties and a matching hat as a gift for a new mom and dad.  This was one of the "I forgot to get a picture projects".  I made these from a pattern out of a book and luckily the booties were on the front cover so this is what they looked like....  but I made them in pink and off-white:
My youngest recently turned 3 and he decided that he wanted to have a "monster" themed birthday party, which pretty much just means that we eat off of paper plates with monsters on them :-)  We had 4 kids that were invited to the birthday party so I put together some party favors for them (and my 2 as well).  Have you seen those Ugly Dolls?

They were perfect for the theme of the party and a great little give aways for the kiddos (considering 3 of the 6 kids were under 2 years old) but even the smallest Ugly Doll is $10.99, which is a little much for a party favor.  So what did I do?  I made my own.  I have tons of micro fleece leftover from Halloween costumes in years past so I drew some up, made sure the size was going to fit into the monster favor bags that we got and I whipped them out. The most time consuming part was the embroidery, but even with the embroidery, these came together rather quickly and the best part, they didn't cost me anything to make since I had the materials already.   I neglected to get a picture of them all together, because they were all different, but here are the 2 that I made for my boys:

I have started a small collection of vintage Pyrex.  I am attracted mostly to the ones that are blue/blue green with fun designs.  The first set that I bought was the Amish print: 

A few months ago I got an e-mail from my BFF in Chicago, Jessica, saying that I should be expecting a package in the mail soon.  So, as expected UPS showed up and delivered a box at my door step and the minute I picked it up and heard some jingling and I thought, "MAN, I hope that isn't glass".  It sure was, Jessica bought me 2 Pyrex bowls off of eBay that had an AMAZING pattern printed on them, one that I had not previously seen before.  

Unfortunately the big bowl was shattered in the package.  Since the package was shipped directly from the seller, I told Jessica so that she should get some of her money back and she did, but I couldn't let those broken pieces to waste.  So I picked out the broken piece with the best pattern on it and made this as a thank you gift for Jessica:


I soldered around the piece and made a pendant out of it.  Anyone that has ever soldered before knows how difficult it can be to get it right...  I had a few trial and errors and this took me a while to accomplish but I am super happy with the result.  I use lead-free solder, that replaces the lead content with sterling silver, I added a sterling jump ring to the top and put it on a sterling 18" chain.  I need to wait until the Spring (I solder outside) when it warms up to solder myself one!!  :-)

I have a few other projects in the works right now and hopefully I will remember to take pictures of them all.

On a side note....  The kids decided on store-bought Halloween costumes this year, so I didn't make them.  I'm not sure if it that or the fact that life is just crazy busy right now, but I am also running out of time to make my Christmas cards this year, so I might have to settle on store-bought cards.  I know!!!  Nutty!!!  But I will try to start earlier next year so that we will have home made cards once again.

Tuesday, October 4, 2011

Quilting

I am finally done with the quilt for my youngest.  It wasn't long ago that my youngest moved into his big boy bed and ever since I have been pushing this quilt to the top of my priority list.  Now that it is getting colder at night, I really was pushing to get it done.

Quilt #1:
The 1st quilt I made for my oldest and I decided to make it instead of buy it because I wanted to be able to wash it.  It doesn't matter where you buy your bed spreads these days, they just aren't made to be washed, to last or to really be used.  I guess it is pretty genius in the business world because then we are just forced to buy more...  however in the sustainable, practical and frugal world...  it is just ridiculous.

Traditionally, early quilting was stuffed with flour sacks and materials that were to be thrown away and instead were reused and up-cycled.  This is the direction that I wanted to go.  At least if I stuffed my own quilts, I would know what was inside and I would KNOW that whatever was in there wouldn't melt in the washer or the dryer.  So I dug out all of the dingy, flannel and brushed cotton sheets that I have accumulated and refused to use and stuffed the quilts with those.  They are light enough for the summer and heavy enough in the winter.

My Oldest son's favorite colors are orange and yellow and when his room needed to be repainted, he told me he wanted the walls orange...  I decided on a compromise (painting only one wall):

This is right about the time when Anna Maria Horner came out with this book and I loved how she pieces the cover quilt together (hanging on the edge of the crib).

It wasn't the construction of the quilt, it was the color choices she made with the fabric.  With this in mind I started accumulating little bits of fabric here and there to piece together a simple "scrap" quilt.  I did only a little hand quilting with embroidery floss (a la Anna Maria Horner) for the utility of it.  I used 100% cotton sheets for the backing and the binding and this is how it turned out.


The best part is that my oldest LOVES his quilt...  still... to this day!!!  I think he was the most excited to see how his brother's turned out than anyone.

Quilt #2:
I had a lot of scraps from the 1st quilt and I wanted the 2nd one to "go with" the 1st one but not be too matchy matchy.  Each of my boys have their own room with their own twin size bed, but the beds are bunk beds in case they ever want to share a room.  So the quilts needed to match but I wanted each to reflect their own personality.

So, I started collecting different fabrics for the 2nd quilt with my youngest in mind.  Once I felt that I had a good mix, I decided on lay out that I also wanted to be slightly different.  This one is still a "scrap quilt" but I decided to keep the scraps in the center and I cut apart a 100% cotton sheet to make the green edges. I also bound the quilt with bias tape that I made from a 100% cotton sheet that I cut apart and I used a flat 100% cotton sheet for the backing.  I did a little more hand quilting with this one, I outlined the edge of the scraps on the solid fabric with matching embroidery thread.


I love how this turned out and I am glad that I got it done before winter arrived.  Now I have my mind set on a King size quilt for my bed....   I think that might take me a little longer to complete  :-)  Happy Quilting.

Tuesday, September 27, 2011

Crochet Crazy & Free Pattern

It seems like I have been crocheting like mad lately.  Here are a few things that I have been working on:

This is the Crochet Flower Scarf that I crocheted as a class sample for a class that I am teaching, for more info click here.
This is the Chunky Lace Crochet Scarf that is also a class sample for a class that I am teaching. For more info, click here.


 A special thanks to Jessica for modeling both scarves for these photos :-)


I am also working on this scarf that I am lovingly referring to as my "Jessica Copycat Scarf".  Jessica made one of these and I LOVED it so I am making one out of the same yarn, but different color way.  So far so good one this one.


And as promised here is a free pattern for the Jumbo Crochet Flower with Poof.

Materials:

Yarn- Super Bulky yarn.  For a solid color I recommend Gedifra Highland Alpaca.  For a variegated color  I recommend Berroco Sundae.  (both of these yarns are available at Urban Arts + Crafts in KC,MO)
Hook- P (11.5mm)
Darning needle, scissors

Abbreviations & Symbols:


For symbols, please refer to this chart with 1 exception; I drew a straight line for the "in back loop only", and 2 additional symbols; the small star indicating where to start, and the small triangle indicating where to end and tie off.

Ch - chain
SlSt - slip stitch
SC - single crochet
HDC - half double crochet
DC -  double crochet
St - stitch
Sts - stitches
Image A

Pattern: (see image A)


Row 1: Ch 4, SlSt into 1st Ch to create a circle

Row 2: Ch 2, DC 9 into the circle, SlSt into the top of the (Ch 2).

Row 3: *Ch 3, working into the back loops only, skip one DC, SlSt into the next DC from precious row.  Repeat from * 3 times. Ch 3, SlSt into the top of the (Ch 2) from row 2.

Row 4: [SC, 1HD, 2DC, 1 HD, SC] into each of the (Ch 3) loops.  SlSt into the back post of the (Ch 2) from row 2.

Row 5: Ch 5, SlSt into the back post of the DC to create the next row of petals.  Repeat 4 times.

Row 6: [SC, 1HD, 3DC, 1HD, SC] into each of the petal loops.  SlSt into the last post. Tie off. Tuck in ends.

Image B

For center "poof" (see image B):  With a different color yarn (if desired), SlSt into one of the front loops of the center DCs, created in Row 2.  DC into each of the front loops of the DCs.  Tie off leaving a 6"-9" tail.
Image C

(See image C)- Using a darning needle, thread tail and wrap around each of the back loops of the DCs that you just created, then pull taunt to close the poof.  Tie off and tuck in ends.


The above photos are the finished product.  I used Gedifra Highland Alpaca in the colors 2980-Teal and 2907 Kiwi.

The above photo shows another flower that I made with Berroco Sundae in the color 8715-Isle of Skye.  This flower I added on a 3rd row of petals.

That's it for now.  I am almost done with my son's quilt...  I just have to make and sew on the binding.  Hopefully I will get that done soon :-)      PS. feel free to e-mail me with any questions about this pattern.  Happy Crocheting!!


Thursday, September 8, 2011

Baby Boom

Another baby, another Nappy Bag.  This is one of my favorite go-to gifts for new or expecting moms.  Sometimes I knit hats and booties, but if I actually have the time to sit down and make something, these nappy bags tend to be a little more "instant gratification".  I have made many including this one, this one and of course mine.  The pattern is actually called "Nappy bag" and it is made by Amy Butler.  I have made some minor alterations for aesthetics and function so the ones that I make are a bit different than the pattern...  but the pattern is a good one and pretty easy to make.  I highly recommend it!


The pattern also comes with instructions to make a changing pad and the cover for the changing pad.  The intention is that the changing pad is rolled up and fits into a "yoga mat style bag" for transportation.  This was the first time that I made the changing pad and I thought that rolling it and putting it into a bag was a little much to be carrying around in the diaper bag.  So, I skipped the bag, took a bunch of liberties with the changing pad and decided that a folded version was a little less bulky. Basically I just used the size as a reference and made up the rest.

The best (or worst) part about the nappy bag pattern is that there is a ton of extra fabric left over.  So I used some of the scraps to patchwork the "pretty side" of the changing pad.  I used a solid colored flannel for the "functional side".  Despite having made a quilt before, I have never machine quilted anything.  I thought that this would be a good opportunity to test out those skills since this was such a small piece.  I quilted this one in the traditional diagonal pattern.  It turned out kind of "Vera Bradley", which (no offense to her or her admirers) I am not really a fan of.  But it was o.k.  I think I might do it differently in the future but I love how this one tuned out.  I picked a coordinating fabric for the binding and made my own "bias" tape.  I didn't actually cut it on the bias because I didn't like the lay out of the fabric pattern on the diagonal.  I used natural cotton batting for the inside so the entire changing pad is 100% cotton which means that it is 100% washable!!


Since I had extra fabric, I also made a diaper pouch.  I saw this free pattern on line and thought I would whip it out.

I used left over cotton batting for the inside and leftover fabric + linen that I had.  I liked how it turned out....  I think I would make some simple alterations for the next time to make construction a little easier. (I didn't iron it after I made it, so pardon the wrinkles)....   it also tuned out to be deep enough to also house a small disposable container of wipes, which I added after the pictures were taken


And last but not least here is the actual bag.  Can you tell that the baby is a girl?  Even when I am making these for the ladies that are having boys, I always make them with a feminine touch because I think that these make great purses even after the kiddos are potty trained.  The exterior fabric [Summer Totem AH37 in Grapefruit from the Loulouthi collection] and changing pad binding fabric [Hugs and Kisses AH45 in Candy from the Loulouthi collection] are Anna Maria Horner and the interior fabric is Art Gallery [Cherry Lace from the Bohemian Soul collection].  All of these fabrics were purchased at Urban Arts + Crafts in KC.


***Side Note:  I am a super over achiever and I have started embroidering care tags for the inside of these bags.  The first one I embroidered was for this bag and I just hand wrote out the instructions on a piece of linen and embroidered on top.  This time, I wanted to be a little more uniform so I though, 'why not stamp it first'?  I figured it was pretty much similar to an iron on embroidery pattern, but I have more control...  I used Tim Holtz's Distress ink, which I had.  These inks are semi transparent so if you end up seeing any of the stamp, it won't be that noticeable.  It turned out great and this has opened up a whole new world for "embroidery patterns".


That's it for now...  up next is a free crochet pattern!!