Thursday, December 15, 2011

A Letter to Santa

Dear Santa,
      Are you hiring?  I am not sure what the qualifications are for working at your establishment but I have been making Christmas gifts every Christmas season since, well, before I can remember.  So far this year, I have knitted and crocheted every skein of yarn that I could get my hands on,  I have embroidered anything that would sit still and I have also decoupaged my kids' pictures to every flat surface imaginable.  I know that you are usually not in the greeting card business, but I also make and send 120 Christmas cards every year.  I should also mention that I have an annual date with Target, the day after Christmas, to stock up on half price Christmas decorations.... so you know I am not lacking in Christmas spirit.  I enjoy Christmas cookies and candies way more than I should, I LOVE to make and consume homemade hot cocoa and I am pretty sure that my ears have started to grow points on the top.   I know that you probably get a bazillion applications each year, but please consider me for your 'factory'.  As an added bonus, if you hire me you will gain 2 additional pint size elves that might not be hard working and are a bit unruly but they are very easily trained!  And you will get 1 large elf that can fix anything, including the motor reindeer for that sleigh of yours.  Thanks for considering me and I can't wait for your visit this year!

Thanks a million! ~ Cornflower Blue :-)


So far I am remember to take photos of all of my elfing creations.  Since they are surprises for the recipients, I will post them after the holidays.  Until then, Happy Elfing!!!

Tuesday, November 29, 2011

Here I am Baby....

Signed, Sealed and Delivered!!!  They are all cut, glued, tied, signed, stuffed, sealed, stamped, addressed, mailed and most are delivered!  I didn't think that I was going to have time to make my Christmas Cards this year, but after lots of peer pressure, I was forced decided to make them despite the time crunch and I can't believe that I got them done in time!!!!

For those of you that aren't familiar with my neuroses, I develop what I like to refer to as "Holiday Anxiety" if I receive a Christmas/Holiday card in the mail before mine are sent out.  I'm serious, it ruins my whole holiday season!!!   Since Thanksgiving is kind of the "kick-off" of the Christmas season, I have decided (for everyone) that Holiday Cards sent/delivered and received before Thanksgiving are just wrong and hereby off limits and any that are received before Thanksgiving are disqualified from my self proclaimed "Holiday Card race".  I am pretty sure that I am the only one competing but if it provides me with a touch of amusement, then so be it.

This year, I won the race!!!  WOOHOOOOOO   and since everyone (pretty much) has theirs, I am going to share them.  Also, for those of you that don't know me, I make 120 Christmas Cards every year and the list keeps growing (although I kinda trimmed my list this year, sorry if you didn't get one).  Last year I went pretty crazy with them and they took me FOREVER to make, this year they are a bit simpler, but I still love how they turned out.

The complete card:
There is a hang tag/Christmas ornament hanging on the front of the card with the annual Christmas kiddo picture, backgrounds are cut pieces of scrapbook paper:
This year, the ornament has a bonus picture on the back:

The holiday greetings on the inside were the center cut-out portions from the ornament that were stamped and glued onto the inside:
The ornaments are hung on lace weight yarn and attached with a sticker on the inside.  They are made to be removed and hung on the receiver's Christmas tree:
These took up all of my time for 2 weeks, and now I have a bunch of extra time to get some of my Christmas presents made!!!  WOOOHOOO!!!!  Hope you liked them this year!!  Not sure what next years will look like, I imagine I won't know until the last possible moment.  I have a few more things to post soon!  Happy Holidays All!!!!  

Friday, November 18, 2011

'New' Bag!

It is pretty rare that I do a project for myself, especially this time of the year.  But this guy was begging for my attention.

Let me start from the beginning, I need a pair of knee high brown boots.  I am super cheap so I don't really want to spend the money for a new pair, in addition...  I need them in their prime season so it is unlikely that I will find them on SUPER sale.  So one day when I was in the post office, I decided to venture into the trendy second hand store a few shops down in hopes that someone with huge feet like me just happened to get rid of a pair of barely-used-chocolate-brown-pleather-high-heel boots.  No such luck but I did find the cutest bag ever!  Unfortunately it was a fake Dolce&Gabbana bag (and yes I am totally American and pronounce Gabbana like Cabana, and no matter what anyone says, I am going to keep pronouncing it like that).  #1 problem with the bag = I don't do logos...  I don't wear name brands and if I happen to have a name brand item of clothing, there must be no exterior indication of said brand or I won't wear it.  Not sure why I am like this but I am, and have been for a long time.....  I remember my aunt giving me a small Coach bag for my birthday when I was in high school and she almost had a heart attack when I ripped of the logo.  #2 problem with the bag = it is fake (and not even a good fake)...  I am not in the habit of supporting China's "copycat" industry and I am also a firm supporter of free trade.  However, I really loved this bag and I feel that by buying it used, I am not technically supporting the industry, some may disagree.... but the bag was in my signature color.... what else was I supposed to do :-)  ???    Here is the bag.
Cute right?  Well, the exterior is in really good condition but upon further inspection, the inside is well used and kinda gross.  I tend to be a bit of a germ-a-phobe at times and the evidence of someone else's germs and more obviously, the oil from their hands was all over the cheap lining.  I was more than grossed out.


So what did I do?  I replaced the interior lining, the lining in the 3 exterior pockets and almost as importantly, the logo.  I picked a Tula Pink fabric (that I LOVE), I rearranged the interior pockets and I hand sewed them into the bag.  Attaching the linings went pretty slow considering I was hand sewing it them...  but I wanted to use the original holes made from the original stitching so that 1. you couldn't tell that it wasn't the original lining of the bag and 2. I didn't want to perforate the pleather anymore.  I originally planning on getting a brooch to match and pin it where the logo had once been, but I couldn't find one that I liked.  I did however just happen to have an iridescent button in my button collection that picked up all the colors in the bag.  I just tacked the button on in case I ever do find a few brooches to match.  I LOVE the bag and it was totally worth the effort.  What do you think?
Check out the stitching....  there are 2 parallel seams at the top of the bag, the very top one is the one that I sewed in by hand and the one just underneath it is original.
The stitching around the exterior pockets is mine too.


Wednesday, November 16, 2011

Hunting Season

With the holidays right around the corner, I am working on tons of things...  simultaneously.  I have one down and many to go so I am going to try and share as I go.

I have lived in the Midwest for 15 years and although I have acclimated to the Midwest lifestyle, I still don't embrace the "hunting" culture.  I don't like guns, I don't like the idea of slaying animals for any purpose and I couldn't imagine hanging a dead animal on my wall.  I don't eat much meat but I do eat meat and I know that is slightly hypocritical and a definite contradiction, but I guess the only way I can justify it is because I am not staring in the eyes of the food I just ate.  Luckily, my husband isn't a hunter like his dad, brother and most of his extended family but I think he still experiences a bit of nostalgia and comfort associated with hunting and alike.  So, when I showed him what I wanted to hang on the wall in our living room, he was psyched!!!  Here is the original item that I saw on Etsy and HAD TO HAVE IT....
The Etsy Store name is Banana Tree Studios and her stuff is amazing!!!  I love her innovative designs and I highly recommend everyone checking out the store.  I wanted to buy this guy on the spot but when I saw the price, I figured I might be able to make my own even cheaper.

When I showed my father in law what I wanted to do, he went straight to work looking for a plastic mounted deer head just like the above for less money and whaaaalaaaa, he found on ebay for a fraction of the price!  So I bought it, bought some spray paint and now I have a guy just like the one above hanging on the wall in my living room... and I LOVE IT!!!!!  I think it is safe to say that I have officially embraced the hunting culture that is so popular here in the Midwest without harming any animals!!  :-)  Here is my process:

This is what it looked like when it arrived, it is heavy plastic with lots of detail, painted with natural colors. (excuse the box, I know it is distracting)


1st coat, primer.  I recommend it when painting anything that you don't think would accept the paint.  It looks awesome white too!!!  But I like color too much to leave it this way.

 Here is the final product!!!   To explain where it is mounted a little better; I have a vaulted ceiling in my living room as you can see at the top of the picture.  The ceiling in my kitchen is not vaulted so this is the section of wall that drops down to meet the kitchen ceiling.

The colors are bad in this next photo, but I gave you enough to see the ceiling in my kitchen to get a better idea of where it is in the house. (the wall color in my living room is a light green apple green, so it is a bit less 'electric' than in the above pictures and it is much more colorful than in the below picture...  I think I need a better camera!)

I was peer pressured into making my Christmas cards this year :-)  even though I tried so hard to talk myself out of it!  So I am back to work on those...   :-)  hopefully I will have a post on those within the week!  

Tuesday, November 8, 2011

Busy

It's been a while, I know....   I have been making a bunch of stuff lately, but the rest of life has been so busy that I haven't had time to post about all that stuff :-)  I actually haven't had time to remember to take pictures of all that stuff either...

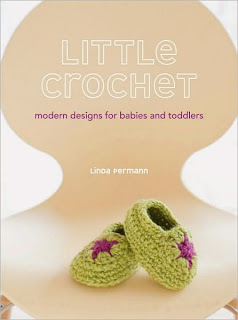
I recently crocheted several sets of baby booties and a matching hat as a gift for a new mom and dad.  This was one of the "I forgot to get a picture projects".  I made these from a pattern out of a book and luckily the booties were on the front cover so this is what they looked like....  but I made them in pink and off-white:

My youngest recently turned 3 and he decided that he wanted to have a "monster" themed birthday party, which pretty much just means that we eat off of paper plates with monsters on them :-)  We had 4 kids that were invited to the birthday party so I put together some party favors for them (and my 2 as well).  Have you seen those Ugly Dolls?

They were perfect for the theme of the party and a great little give aways for the kiddos (considering 3 of the 6 kids were under 2 years old) but even the smallest Ugly Doll is $10.99, which is a little much for a party favor.  So what did I do?  I made my own.  I have tons of micro fleece leftover from Halloween costumes in years past so I drew some up, made sure the size was going to fit into the monster favor bags that we got and I whipped them out. The most time consuming part was the embroidery, but even with the embroidery, these came together rather quickly and the best part, they didn't cost me anything to make since I had the materials already.   I neglected to get a picture of them all together, because they were all different, but here are the 2 that I made for my boys:

I have started a small collection of vintage Pyrex.  I am attracted mostly to the ones that are blue/blue green with fun designs.  The first set that I bought was the Amish print: 

A few months ago I got an e-mail from my BFF in Chicago, Jessica, saying that I should be expecting a package in the mail soon.  So, as expected UPS showed up and delivered a box at my door step and the minute I picked it up and heard some jingling and I thought, "MAN, I hope that isn't glass".  It sure was, Jessica bought me 2 Pyrex bowls off of eBay that had an AMAZING pattern printed on them, one that I had not previously seen before.  

Unfortunately the big bowl was shattered in the package.  Since the package was shipped directly from the seller, I told Jessica so that she should get some of her money back and she did, but I couldn't let those broken pieces to waste.  So I picked out the broken piece with the best pattern on it and made this as a thank you gift for Jessica:


I soldered around the piece and made a pendant out of it.  Anyone that has ever soldered before knows how difficult it can be to get it right...  I had a few trial and errors and this took me a while to accomplish but I am super happy with the result.  I use lead-free solder, that replaces the lead content with sterling silver, I added a sterling jump ring to the top and put it on a sterling 18" chain.  I need to wait until the Spring (I solder outside) when it warms up to solder myself one!!  :-)

I have a few other projects in the works right now and hopefully I will remember to take pictures of them all.

On a side note....  The kids decided on store-bought Halloween costumes this year, so I didn't make them.  I'm not sure if it that or the fact that life is just crazy busy right now, but I am also running out of time to make my Christmas cards this year, so I might have to settle on store-bought cards.  I know!!!  Nutty!!!  But I will try to start earlier next year so that we will have home made cards once again.

Tuesday, October 4, 2011

Quilting

I am finally done with the quilt for my youngest.  It wasn't long ago that my youngest moved into his big boy bed and ever since I have been pushing this quilt to the top of my priority list.  Now that it is getting colder at night, I really was pushing to get it done.

Quilt #1:
The 1st quilt I made for my oldest and I decided to make it instead of buy it because I wanted to be able to wash it.  It doesn't matter where you buy your bed spreads these days, they just aren't made to be washed, to last or to really be used.  I guess it is pretty genius in the business world because then we are just forced to buy more...  however in the sustainable, practical and frugal world...  it is just ridiculous.

Traditionally, early quilting was stuffed with flour sacks and materials that were to be thrown away and instead were reused and up-cycled.  This is the direction that I wanted to go.  At least if I stuffed my own quilts, I would know what was inside and I would KNOW that whatever was in there wouldn't melt in the washer or the dryer.  So I dug out all of the dingy, flannel and brushed cotton sheets that I have accumulated and refused to use and stuffed the quilts with those.  They are light enough for the summer and heavy enough in the winter.

My Oldest son's favorite colors are orange and yellow and when his room needed to be repainted, he told me he wanted the walls orange...  I decided on a compromise (painting only one wall):

This is right about the time when Anna Maria Horner came out with this book and I loved how she pieces the cover quilt together (hanging on the edge of the crib).

It wasn't the construction of the quilt, it was the color choices she made with the fabric.  With this in mind I started accumulating little bits of fabric here and there to piece together a simple "scrap" quilt.  I did only a little hand quilting with embroidery floss (a la Anna Maria Horner) for the utility of it.  I used 100% cotton sheets for the backing and the binding and this is how it turned out.


The best part is that my oldest LOVES his quilt...  still... to this day!!!  I think he was the most excited to see how his brother's turned out than anyone.

Quilt #2:
I had a lot of scraps from the 1st quilt and I wanted the 2nd one to "go with" the 1st one but not be too matchy matchy.  Each of my boys have their own room with their own twin size bed, but the beds are bunk beds in case they ever want to share a room.  So the quilts needed to match but I wanted each to reflect their own personality.

So, I started collecting different fabrics for the 2nd quilt with my youngest in mind.  Once I felt that I had a good mix, I decided on lay out that I also wanted to be slightly different.  This one is still a "scrap quilt" but I decided to keep the scraps in the center and I cut apart a 100% cotton sheet to make the green edges. I also bound the quilt with bias tape that I made from a 100% cotton sheet that I cut apart and I used a flat 100% cotton sheet for the backing.  I did a little more hand quilting with this one, I outlined the edge of the scraps on the solid fabric with matching embroidery thread.


I love how this turned out and I am glad that I got it done before winter arrived.  Now I have my mind set on a King size quilt for my bed....   I think that might take me a little longer to complete  :-)  Happy Quilting.

Tuesday, September 27, 2011

Crochet Crazy & Free Pattern

It seems like I have been crocheting like mad lately.  Here are a few things that I have been working on:

This is the Crochet Flower Scarf that I crocheted as a class sample for a class that I am teaching, for more info click here.
This is the Chunky Lace Crochet Scarf that is also a class sample for a class that I am teaching. For more info, click here.


 A special thanks to Jessica for modeling both scarves for these photos :-)


I am also working on this scarf that I am lovingly referring to as my "Jessica Copycat Scarf".  Jessica made one of these and I LOVED it so I am making one out of the same yarn, but different color way.  So far so good one this one.


And as promised here is a free pattern for the Jumbo Crochet Flower with Poof.

Materials:

Yarn- Super Bulky yarn.  For a solid color I recommend Gedifra Highland Alpaca.  For a variegated color  I recommend Berroco Sundae.  (both of these yarns are available at Urban Arts + Crafts in KC,MO)
Hook- P (11.5mm)
Darning needle, scissors

Abbreviations & Symbols:


For symbols, please refer to this chart with 1 exception; I drew a straight line for the "in back loop only", and 2 additional symbols; the small star indicating where to start, and the small triangle indicating where to end and tie off.

Ch - chain
SlSt - slip stitch
SC - single crochet
HDC - half double crochet
DC -  double crochet
St - stitch
Sts - stitches
Image A

Pattern: (see image A)


Row 1: Ch 4, SlSt into 1st Ch to create a circle

Row 2: Ch 2, DC 9 into the circle, SlSt into the top of the (Ch 2).

Row 3: *Ch 3, working into the back loops only, skip one DC, SlSt into the next DC from precious row.  Repeat from * 3 times. Ch 3, SlSt into the top of the (Ch 2) from row 2.

Row 4: [SC, 1HD, 2DC, 1 HD, SC] into each of the (Ch 3) loops.  SlSt into the back post of the (Ch 2) from row 2.

Row 5: Ch 5, SlSt into the back post of the DC to create the next row of petals.  Repeat 4 times.

Row 6: [SC, 1HD, 3DC, 1HD, SC] into each of the petal loops.  SlSt into the last post. Tie off. Tuck in ends.

Image B

For center "poof" (see image B):  With a different color yarn (if desired), SlSt into one of the front loops of the center DCs, created in Row 2.  DC into each of the front loops of the DCs.  Tie off leaving a 6"-9" tail.
Image C

(See image C)- Using a darning needle, thread tail and wrap around each of the back loops of the DCs that you just created, then pull taunt to close the poof.  Tie off and tuck in ends.


The above photos are the finished product.  I used Gedifra Highland Alpaca in the colors 2980-Teal and 2907 Kiwi.

The above photo shows another flower that I made with Berroco Sundae in the color 8715-Isle of Skye.  This flower I added on a 3rd row of petals.

That's it for now.  I am almost done with my son's quilt...  I just have to make and sew on the binding.  Hopefully I will get that done soon :-)      PS. feel free to e-mail me with any questions about this pattern.  Happy Crocheting!!