

Wednesday, December 19, 2007
Current projects
I have about 50 Projects going on right now. Unfortunately I can't share most of them because they are Christmas presents. Soooo I will share those after Christmas so they remain a surprise :) One that I can share is a wreath I made for this holiday season. I used a wire wreath frame, 2 very fluffy white boas (the ones with both the feathers and down), 1" glass ornaments in assorted colors, and wire. I wrapped the wreath frame with the boas and then I wired the ornaments to the wreath frame. I made the wire extra long so that the ornaments didn't get lost in the feathers. I love the way that it turned out even though my husband thinks it is a bit girly :) I guess that what he gets from having a woman decorate his house... haha!
Monday, November 26, 2007
Possible Project
Soo... today I made a "prototype" for my handmade ornaments this year. Every year I give away handmade ornaments for Christmas and I always try to do something different from the past years. This year I thought about doing a soldered ornament. I went round and round about what kind of shape I was going to make and how it was going to go together and I came up with a soldered angel. It went together pretty well but I think the end result is a bit cheesy! It reminds me of one of those elaborate soldered night lights? I am not sure if that is what I am going to do for this year's ornament, but I am running out of time and ideas, so I might not have much of a choice. You be the judge :-)
Monday, October 29, 2007
Completed Project-Vertical Scarf

At the store that I work at, we usually make a sample scarf with any of the new yarn that we get so that customers can see how it knits up. Trendsetter Yarns has a new yarn called Venus. In the skein, the yarn appears to be pretty crazy, but when it knits up it isn't really that crazy. This posed a challenge because with a really crazy yarn, you can knit a really plain/easy scarf and it turns out looking like a masterpiece. But when you use a yarn that is a bit more conservative, then I think the scarf looks a bit plain unless the pattern has a lot of detail. I think there were 3 of us that knitted a bit of the scarf and took it out and finally one of my co-workers decided to knit the scarf vertically instead of horizontally. It turned out SO great that I bought a skein for myself and knitted my own scarf and I think it turned out GREAT. I used the color Garden of Eden, I casted on 300 stitches and knit the entire skein... the scarf turned out great. The only thing that I would caution someone on, is that you should make sure that you cast on and bind off very loosely. Even if you do that, you will still have to block it in the end... but I think it is well worth the effort. The more I look at it, the more I want to make another but I think that I might just make the next one out of scrap yarn. I also think it will be interesting if I leave the tails as fringe at each end, which makes it even easier because you don't have to weave in any of the ends.


Completed Project-Halloween Costume
When I was growing up, my mom made most of my clothes. Not out of necessit y, but because she like doing it. Her desire to make my clothing included making my Halloween Costumes. In fact, even when she didn't have the time to make my clothes, she found the time to make my costume. And these costumes weren't the run of the mill hand made costumes... some of them were elaborate works of art that could compete with Hollywood and Walt Disney.

 y, but because she like doing it. Her desire to make my clothing included making my Halloween Costumes. In fact, even when she didn't have the time to make my clothes, she found the time to make my costume. And these costumes weren't the run of the mill hand made costumes... some of them were elaborate works of art that could compete with Hollywood and Walt Disney.
Sooo basically I have HUGE shoes to fill... not because I want to compete but because I would like to carry on the tradition. I also LOVE to sew and like to be able to have the versatility to make my son a costume of anything he wants to be. This year is my 2 year old son's 3rd Halloween and so far he doesn't quite grasp the concept enough to know what he wants to be for Halloween. Sooooo I get to choose :-)
For his first Halloween, I bought a standard McCall's Halloween Pattern and pretty much followed it to a T. I just wanted to judge what my abilities were in the costume making department and figured that the following year I could be more elaborate. So, last year I made an Elvis costume for my then 1 year old son. For those of you that don't know, I am from Las Vegas and I have a large "Shrine" in my house devoted to the King. The neatest part about the costume was that we were in Las Vegas visiting my parents and few back on Halloween last year. Needless to say there were Elvis spottings in Las Vegas, Kansas City, and all over the open skies.
This year I thought that my son would have more of an opinion, but I was wrong... so I picked his favorite toy to play with.... a Staples Easy Button. The irony is that I used to work for a company that is now owned by Staples, so I thought that it was appropriate. I went round and round about how I was going to make the costume and then I started to think, "Is any one going to know what he is supposed to be?" Despite my reservations I did make the costume and the look on his face when I showed him the costume made it all worth it. He couldn't believe that I had this giant Easy Button. So I just tacked on the actual button so that after Halloween, I can take it off so that he can have the button.
This past Friday we took him to a local University for their "trick or treating" function for the kids and he was definitely the talk of the party... and everyone knew what he was!!! The best part is that my son taps his belly (where the button is on his costume) and says, "That was Easy!"
Sunday, October 14, 2007
Art at Park
This weekend was Art at Park (the Art fair at Park University). It is usually a pretty small art fair but since I went to Park University and sold my first painting at Art at Park, I try to make it to the fair every year. This year I actually bought something!!!! There was a new artist, Nichole Collins, at A.A.P and her jewelry was amazing!!! She is fresh out of college and her work definitely reflects her new and fresh approach to metal smithing and jewelry making. There was one necklace there that really caught my eye and I couldn't pass it up! It is sterling silver and the pendants are made of dried flowers that are suspended in tinted resin. I've never seen anything like it and in addition to the unique medium, I loved the overall design of the necklace. The extra bonus is that it is 7 necklaces in one!!! The necklace is made up of 3 separate pendants that can be worn together, in any combination, and separately. I LOVE this necklace and I am soooo glad that I bought it. Check it out:


Friday, September 28, 2007
Photography
When I went back to Pennsylvania to help my dad with my Grandmother's estate in 2005, I dug up some of her outdoor plants and replanted them in my yard here in KC. I took some of her rhubarb that she had for years and I also took a few sedum plants, which she called Live for Evers. This was the first year that I was able to use the rhubarb because I wanted to let the plant get well established before I stared using it. This summer I was able to cut a few of the ribs and made strawberry-rhubarb sauce for french toast that was excellent! You'll just have to take my word for it because the rhubarb is not too photogenic. BUT the Live for Evers finally bloomed this past week or so and they were gorgeous!!! Every year I like to take pictures of the flowers, I think they are super pretty and I also like that they remind me of my Grandma! Enjoy!


Friday, September 21, 2007
Completed Project-Good Luck Owl
I saw recently on the show, Uncommon Threads (on the DIY Network )instruction s for a "Good Luck Doll" and I instantly LOVED the concept. I thought that would be a great housewarming gift.... something that had a great thought behind it and that the person could use as a decoration in their house. I wanted to make this as an additional gift for Emily's housewarming party but I thought that the doll was a bit plain and I didn't think that her boyfriend would be too excited about putting a doll on their couch. Sooo I stored the idea in the back of my head just in case I had an opportunity to make it
 for someone else. Then when I was researching the knitted back pack that I wanted to make for my son, I came across a stuffed owl at Craftsburykids.com. It looked more like a throw pillow than a children's toy.... And then it hit me!!! What about a "Good Luck Owl"?? It wasn't super feminine and it looked like a pillow so I decided to completely "rip off" the Owl design and make one that looked almost exactly like it. I know... I know... doesn't take a lot of creativity, but keep in mind that I decided to make this yesterday, got it done today because tomorrow is the housewarming party. The result is the picture below. I have noticed that the shape of mine is a bit more exaggerated and I made it pretty large. It ended up being 22" tall and 12" wide. I embroidered the face and the feathers on the body are done with fabric paint. I think that it turned out alright but next time I might adjust the pattern and make it a little more "my own".

s for a "Good Luck Doll" and I instantly LOVED the concept. I thought that would be a great housewarming gift.... something that had a great thought behind it and that the person could use as a decoration in their house. I wanted to make this as an additional gift for Emily's housewarming party but I thought that the doll was a bit plain and I didn't think that her boyfriend would be too excited about putting a doll on their couch. Sooo I stored the idea in the back of my head just in case I had an opportunity to make it for someone else. Then when I was researching the knitted back pack that I wanted to make for my son, I came across a stuffed owl at Craftsburykids.com. It looked more like a throw pillow than a children's toy.... And then it hit me!!! What about a "Good Luck Owl"?? It wasn't super feminine and it looked like a pillow so I decided to completely "rip off" the Owl design and make one that looked almost exactly like it. I know... I know... doesn't take a lot of creativity, but keep in mind that I decided to make this yesterday, got it done today because tomorrow is the housewarming party. The result is the picture below. I have noticed that the shape of mine is a bit more exaggerated and I made it pretty large. It ended up being 22" tall and 12" wide. I embroidered the face and the feathers on the body are done with fabric paint. I think that it turned out alright but next time I might adjust the pattern and make it a little more "my own".Thursday, September 20, 2007
Completed Projects-Knitting
I would consider myself a beginner-intermediate knitter. I am a self t aught knitter and was a very basic beginner when I started working at UA+C. Since I am surrounded by advanced knitters and we are permitted to knit when we are at work, I am always inspired to knit more advanced projects. I have been pretty impressed by my knitting accomplishments and recently I decided to take a "stab" at circular needles. I knitted a stocking cap for my 2 yr old son and I think it turned out great. I used Lan'g Yarns' Mille Colori in the color 077 and I followed Ann Norling's Head Hugger Pattern. This is how it turned out:


My next project: When I was in Springfield earlier this month I stumbled across a store that looks like I merchandised!!! They had the cutest things and I would have bought one of everything if I could. One of the things that I thought was SOOOOO cute were these knitted kid's backpacks. I have been looking for a cute little backpack for my son and this fit the ticket. I checked out the price, and although it was very reasonable, I decided for the same price, I could make one myself. I also think that it will be a fun challenge to create the initial pattern. I have tons of yarn and I could use any of those, but I might buy something spec ial for this project.

aught knitter and was a very basic beginner when I started working at UA+C. Since I am surrounded by advanced knitters and we are permitted to knit when we are at work, I am always inspired to knit more advanced projects. I have been pretty impressed by my knitting accomplishments and recently I decided to take a "stab" at circular needles. I knitted a stocking cap for my 2 yr old son and I think it turned out great. I used Lan'g Yarns' Mille Colori in the color 077 and I followed Ann Norling's Head Hugger Pattern. This is how it turned out:
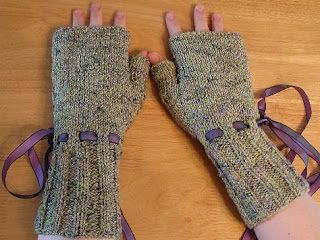
I was also recently challenged to make my own knitting pattern for a pair of fingerless gloves. UA+C generally has free patterns that they give away when you buy 2 balls of one particular yarn. The Free patterns are generally ones that the staff has created, and since I had just made a pair of the Louisa Harding fingerless gloves, I thought figured that I could come up with a pattern for something similar and much much easier. Here is the result. I used On Line Linie 210 Padua and of course, my pattern :-) Here is one of the gloves:
My next project: When I was in Springfield earlier this month I stumbled across a store that looks like I merchandised!!! They had the cutest things and I would have bought one of everything if I could. One of the things that I thought was SOOOOO cute were these knitted kid's backpacks. I have been looking for a cute little backpack for my son and this fit the ticket. I checked out the price, and although it was very reasonable, I decided for the same price, I could make one myself. I also think that it will be a fun challenge to create the initial pattern. I have tons of yarn and I could use any of those, but I might buy something spec
ial for this project.
Tuesday, September 18, 2007
Current work-Kansas Landscape
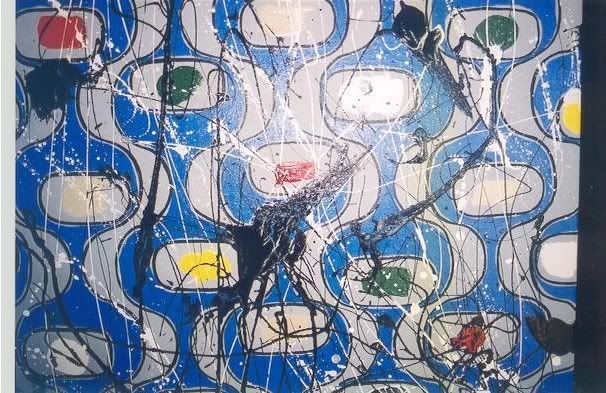
Soo... I have a housewarming party to go to this weekend for my friend and old college roommate, Emily. My usual gift for these types of occasions is a painting and in this circumstance I really wanted to paint her one. She has one of my splatter paintings that I did in 2003, but ever since one of her male friends decided that it reminded him of a certain part of the male anatomy, no one can see past that. I have a feeling that she is probably not going to hang up her splatter painting and I wanted to give her something that she could be proud to own and one that wouldn't remind anyone of any human's anatomy.
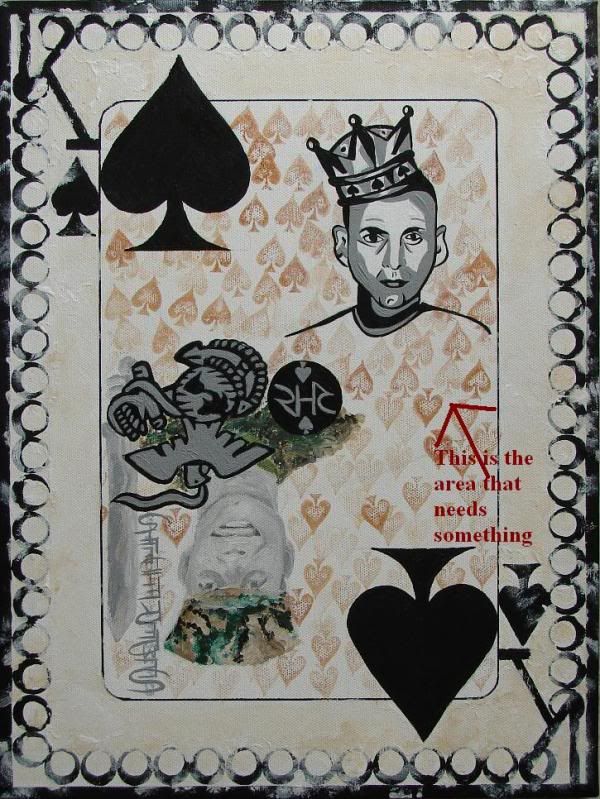
Emily's house is pretty old and the interior architecture is in a traditio nal-arts & crafts-Frank Lloyd Wright-style, so I thought that a landscape would be a pretty traditional subject matter. I also decided to take it in a bold and very colorful direction because the inside of her house is painted in multiple colors. I knew immediately that I wanted to paint her a "Kansas" landscape because both Emily and her boyfriend, Galen, are from Kansas, their new house is in Missouri and I thought that they needed a reminder of where they came from. I like where the painting is but I think that it still needs more... and I am not sure where to go from here.
I hope that I can figure out what I want to do with it before Saturday, because I would really like to give it to her at her party.... we will see how that goes. I also hope that Emily isn't reading this right now, but in case she is.... Happy Housewarming, Em!!!!
Emily's house is pretty old and the interior architecture is in a traditio
 nal-arts & crafts-Frank Lloyd Wright-style, so I thought that a landscape would be a pretty traditional subject matter. I also decided to take it in a bold and very colorful direction because the inside of her house is painted in multiple colors. I knew immediately that I wanted to paint her a "Kansas" landscape because both Emily and her boyfriend, Galen, are from Kansas, their new house is in Missouri and I thought that they needed a reminder of where they came from. I like where the painting is but I think that it still needs more... and I am not sure where to go from here.
I hope that I can figure out what I want to do with it before Saturday, because I would really like to give it to her at her party.... we will see how that goes. I also hope that Emily isn't reading this right now, but in case she is.... Happy Housewarming, Em!!!!
Tuesday, September 4, 2007
Completed Project-Frechy Bag

I finally completed my Frenchy Bag. It looks great and was super easy to sew. The sewing took me about 2 hours and I am really happy with the outcome. Now my sis-in-law, Sally, can stop making fun of my gynormous purses! YAY. Unfortunately this will be the last project for a while! I am moving my craft area from one room to another and that will take me a few weeks to accomplish. I just painted an old desk that I use as a sewing table and once that is done I will be starting to move my stuff. Hopefully it won't take me as long as expected because I have start making my son's Halloween costume, which I think is going to be an easy button this year.... long story. I am also going to have to start on Christmas presents sometime soon. I am not sure at this point what I am going to make this year for everyone, but I am going to have to decide soon cause Christmas is quickly approaching.
Tuesday, August 28, 2007
Current Project-Purses
If you asked me, "what do you collect" I would say, "Lip Gloss, Purses, and Elvis memorabilia" ... in that order. I have a huge obsession with Lip Gloss and I have noticed that lately, I have this huge obsession with purses. Store bought, hand made, big, small, whatever... I like purses!!!!!!!
Recently I have been extremely attracted to VERY large purses. I like that I can carry everything in one bag, sometime even my 2 year old. :-) Well, my latest project was the Amy Butler Nappy Bag. Since my son is a toddler and we are transitioning out of diapers, I don't usually carry a diaper bag with me. BUT this bag is soooo cute, has a ton of pockets and is huge, so I decided to make one to carry as a purse.
 memorabilia" ... in that order. I have a huge obsession with Lip Gloss and I have noticed that lately, I have this huge obsession with purses. Store bought, hand made, big, small, whatever... I like purses!!!!!!!
Recently I have been extremely attracted to VERY large purses. I like that I can carry everything in one bag, sometime even my 2 year old. :-) Well, my latest project was the Amy Butler Nappy Bag. Since my son is a toddler and we are transitioning out of diapers, I don't usually carry a diaper bag with me. BUT this bag is soooo cute, has a ton of pockets and is huge, so I decided to make one to carry as a purse.
I didn't make the changing pad that is included in the Nappy Bag instructions and I altered the pattern slightly. I added 2 locker loops on the inside of the purse; one for my keys and the other for my change purse, and I mitered the corners of the bottom of the purse. I mitered the corners because my biggest complaint about the bag was that the bottom corners were SUPER pointy, so that adjustment was purely aesthetic. It was really easy to sew,the instructions were fairly easy to follow and the actual sewing took me only a few hours. I am really pleased with the way my purse turned out. I even tested it out this weekend on our trip to the zoo(bottom pic), and it fit perfectly on the back of the stroller, which left the basket underneath the stroller open for a bunch of other things!!
I also have 2 other purse projects waiting for me. The first one is another Amy Butler purse, the Frenchy Bag. I was at work this  past weekend and I saw a really great combination of fabrics that I HAD to make into a purse, so I picked the Frenchy Bag. I have the pattern, the fabric and the thread.... I just have to cut it out and get sewing.
 past weekend and I saw a really great combination of fabrics that I HAD to make into a purse, so I picked the Frenchy Bag. I have the pattern, the fabric and the thread.... I just have to cut it out and get sewing.
The 2nd purse project is a little more creative. I was walking through Target a few weeks ago and found this pillow case (bottom right) in the college stuff that was on sale for $3 and some change. The best part about the pillow case is that there is a main floral pattern on one side and a basic coordinating stripe on the other. I immediately thought that it would make a great purse. So, I bought 2. I haven't decided exactly how I am going to design my bacg. I know that it  is going to basically be a tote bag, but I am not sure of the exact size or if I am going to make the handles out of part of the pillow case or if I am going to purchase pre-made handles. I want this purse to be cute but functional, and I am still trying to figure out the best direction to achieve both.
 is going to basically be a tote bag, but I am not sure of the exact size or if I am going to make the handles out of part of the pillow case or if I am going to purchase pre-made handles. I want this purse to be cute but functional, and I am still trying to figure out the best direction to achieve both.
Wednesday, August 8, 2007
*CHALLENGE!*
Things I want to accomplish before my next birthday... I just had one so I have almost a full year for my accomplishments. Lets see the first thing that I want to do is finish my uncle's painting (on right). I am almost done and I just have one element to add. I hope that I get it done before November, because I am seriously considering taking a trip to see him in CA. The second thing that I want to do before my next birthday (notice that I am avoiding telling you which birthday will be next) is start and complete the painting for my sister in law. She just moved into her own place and needs some decor... I have a lot of ideas, I just need to narrow them down. I also just started my Chicago scrapbook (see pics on yesterday's post) and I would really like to get that done in the next year. I hope that it doesn't take me all that long... but it took me 3 months to get started on it so it just might. I am hoping that in November when I take my trip, that my sis-in-law gets to go with... she is turning 21 that week and I was hoping to take her out in Las Vegas (my home town). With that trip I am planning on taking loads of pics and putting them together for her in a scrapbook and giving it to her for Christmas. Of course all of that depends on if she is even able to go on the trip, but I hope that she is and I really hope that the scrapbook works out... cause I think that is a GREAT gift. I also make all of my Christmas gifts, so I guess I should get started on that soon in order for them to be done by this Christmas. That's all of the artistic accomplishments that I want to make before my next birthday... it isn't a lot, but I am a pretty spur-of-the-moment person, so there is a lot that I want to accomplish that I just don't know about yet.
Tuesday, July 17, 2007
Recent Project-Invitations
My son is going to be 2 in 6 days (I can't believe it!!!). My parents are going to be in town for his birthday so I decided to throw him a small party this year and to make his party invitations. We sell pre-made cards and envelopes at the store that I work at.... that made it pretty easy. The images attached are of the card closed
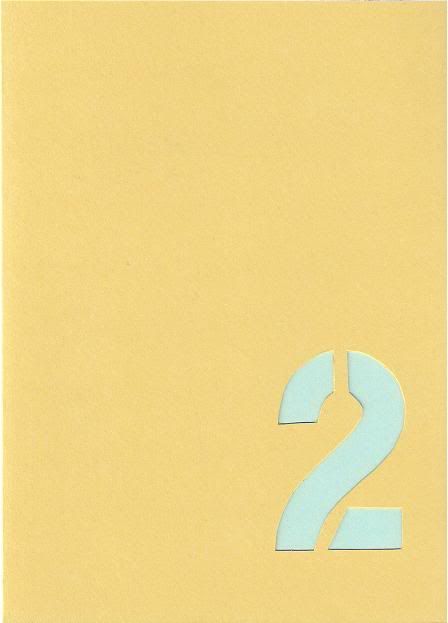
and opened
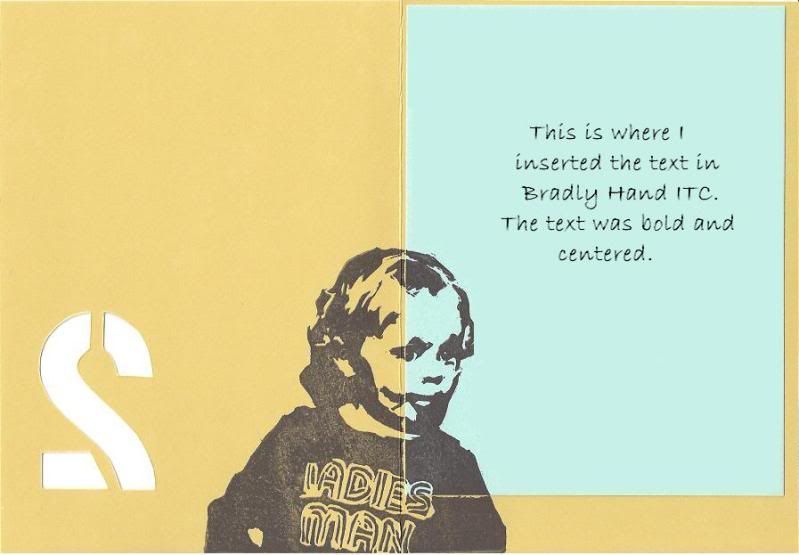
Because I scanned the card, the colors aren't at all accurate. The folded card is actually a puce color, but the card on the inside is a darker/less green- blue. The image of my son is a rubber block print that I carved. I originally carved a linoleum block and was unhappy with the print. The image is small and has fine details that are hard to depict in linoleum. I also wasn't happy with the block printing ink. The details are very small narrow wells that are carved into the linoleum and since block printing ink is so thick it filled the wells and acted more like an intaglio print. So I carved a rubber block and essentially used it like a stamp. I even used an acid free dye based ink pad found in most craft stores. The result is exactly what I was looking for and I am more than happy with the result.
and opened
Because I scanned the card, the colors aren't at all accurate. The folded card is actually a puce color, but the card on the inside is a darker/less green- blue. The image of my son is a rubber block print that I carved. I originally carved a linoleum block and was unhappy with the print. The image is small and has fine details that are hard to depict in linoleum. I also wasn't happy with the block printing ink. The details are very small narrow wells that are carved into the linoleum and since block printing ink is so thick it filled the wells and acted more like an intaglio print. So I carved a rubber block and essentially used it like a stamp. I even used an acid free dye based ink pad found in most craft stores. The result is exactly what I was looking for and I am more than happy with the result.
Thursday, July 5, 2007
College Stuff
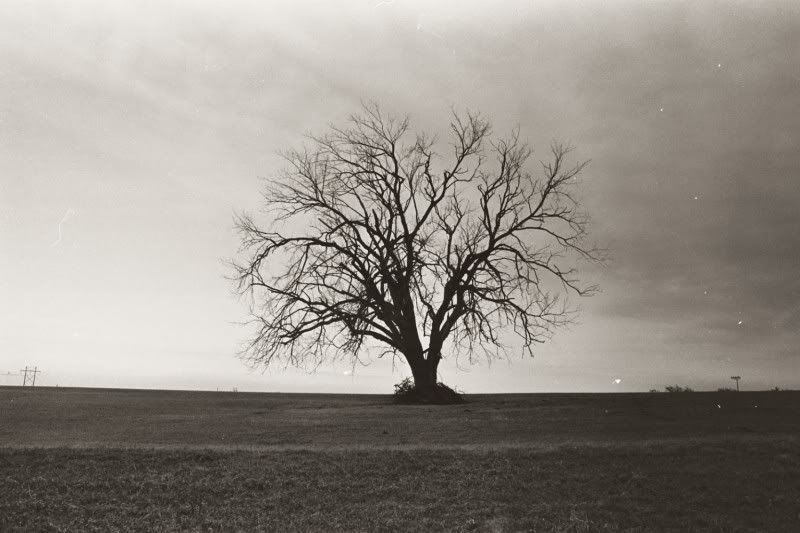
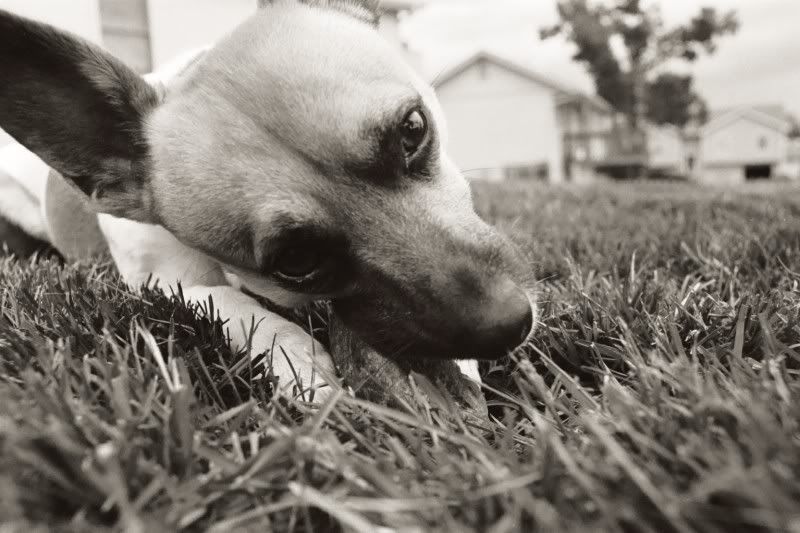
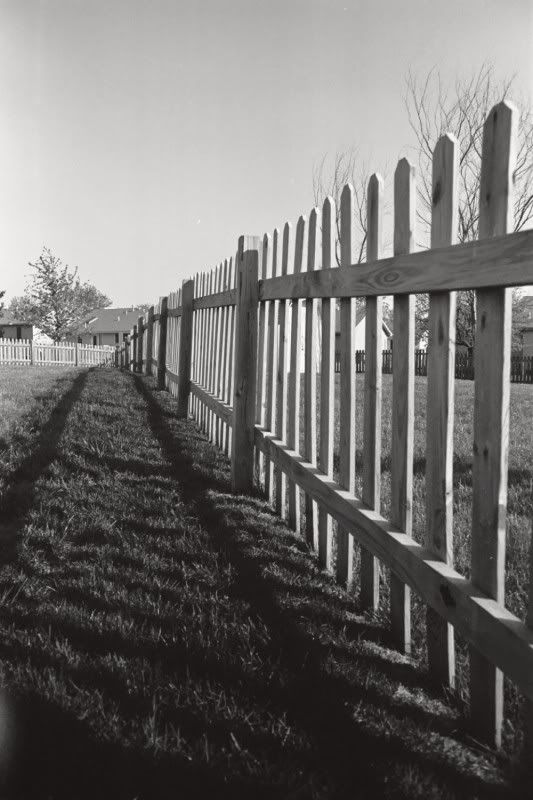
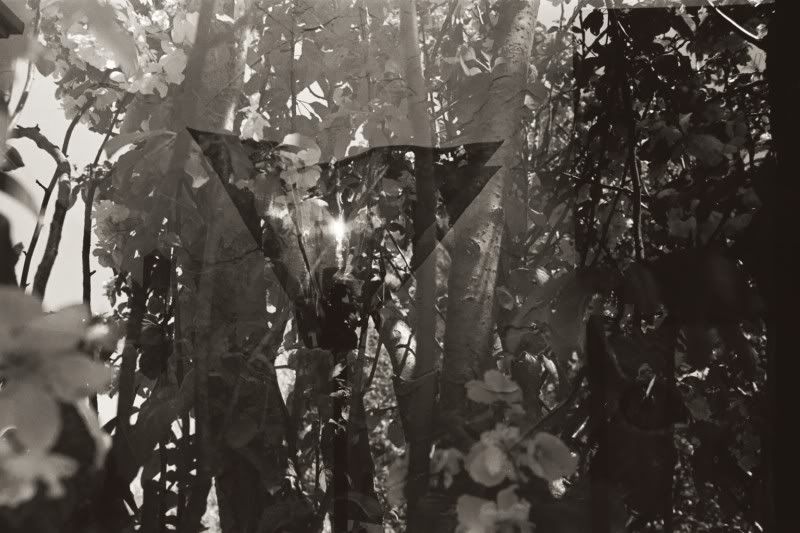
Sooooo...... I have been cleaning like crazy these past few days. I spent the 4th of July scrubbing the entire inside of my house!!! During my clean-scapade I ran across some of my old artwork from college. And when I say some, I actually mean ALL of my old artwork from college. Most of it is stuff that I don't want to get rid of but I don't want to store it either, so it ends up getting moved every time I clean and it has clearly been a huge hassle to keep. Since I see it every time I walk past it, I have a mental inventory of everything that is there, or so I thought. I opened up one of my portfolios and found old black and white pics that I took in my photography class, jr. year of college. Most of the actual printed pictures were the pics that I turned in for a grade, but I found the negatives and the index sheets that I had made and I couldn't believe some of the pictures that were in there!!! There were pictures that I took that I don't even remember taking and since I was poor, like every college student, I only printed the pics that I thought were the best. So, I decided that I wanted to get the film developed to really get a good look at my "mini time capsule". The only issue was that I had 12-15 rolls of film and each roll has 36 exposures! I called around and most 1 hour developers wanted between 22¢ and 40¢ per picture!!! I can't exactly justify spending around $200 just to reminisce and on top of that, most of the pics may not even turn out. So I found out that Target would take the negatives and put all of the images onto a CD for just the cost of the CD, which was $1.99. SOLD!!!! It ended up taking 5 CDs and cost $10 and some change. Now I have the opportunity to really study the pics before I get them printed, and at a quick glance I can easily say that 85%-90% probably won't get printed. Anyway... here are some of the pics that I am astonished that I actually took.
Friday, June 29, 2007
Recent Project: Plush-O-Rama
In addition to being a full time mom, starving artist and working part time at an independent arts and crafts store, I watch an 8 year old named Raechel on her breaks from year-round-school. So... I am always on the lookout for new crafts and projects that she can do while she is here. I was thumbing through the book Plush-O-Rama and I thought that making plush toys with the Raechel would be fun. So she picked out a few examples from the book and we made those. The first toy that we made was directly inspired by Rosa Pomar's Bonecos.
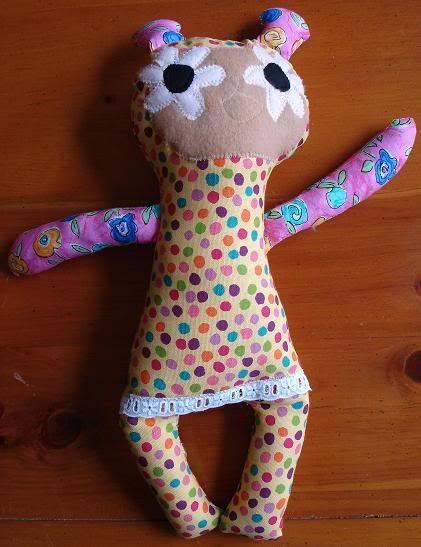
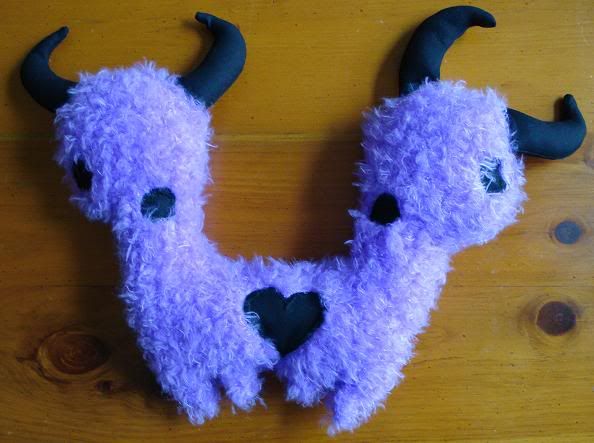
The fabrics that Raechel picked were super cute and I think that she really liked the way that her doll turned out. The 2nd doll that we made for Raechel was inspired by Jenny Harada's Double Devil. Raechel picked out a purple peacock fur instead of the red, and it looks great. I will say that I should have cut the "legs" larger because they ended up a bit scrawny. That's o.k. I really liked working with the peacock fur; It was a little slippery but when I made the final seam on the hole for the stuffing, it was completely hidden because of the fur. There are some faux furs that are soo thick that you can see all of the seams and then there are some that are soo thin that you can see the thread This fur was perfect! AND it is really super soft! I can't wait until my son gets older so that we can make some plush toys from his drawings. I think that in the meantime I will just have to make him some out of my drawings :-)
The fabrics that Raechel picked were super cute and I think that she really liked the way that her doll turned out. The 2nd doll that we made for Raechel was inspired by Jenny Harada's Double Devil. Raechel picked out a purple peacock fur instead of the red, and it looks great. I will say that I should have cut the "legs" larger because they ended up a bit scrawny. That's o.k. I really liked working with the peacock fur; It was a little slippery but when I made the final seam on the hole for the stuffing, it was completely hidden because of the fur. There are some faux furs that are soo thick that you can see all of the seams and then there are some that are soo thin that you can see the thread This fur was perfect! AND it is really super soft! I can't wait until my son gets older so that we can make some plush toys from his drawings. I think that in the meantime I will just have to make him some out of my drawings :-)
Monday, June 25, 2007
Current Projects
Like many artists, I have about 20 different projects going on right now. As I have mentioned, my typical wedding present is a painting. I have a wedding coming up in a few weeks and I am sorry to say that I am SOOOOO busy that I don't think that I will be able to paint one... although by telling myself that I can't do it, now I am somehow getting inspired and dared to try. We will see if that happens. My most recent project wasn't art at all; I knitted a pair of fingerless gloves.
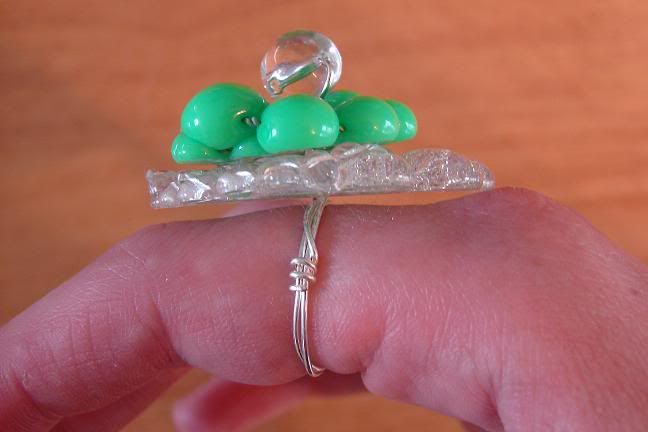
I enjoyed this project immensely!!! The above picture is the end result. The pattern was from the Louisa Harding Gathering Roses Accessories Collection and I used Artful Yarn in Candy. This is the second knitting pattern that I have ever followed and I loved the challenge. I loved it so much that I made my own pattern for an easier pair of fingerless gloves, which might be an Urban A+C's free monthly pattern (I will keep you all updated). On another note Urban A+C is having an Artist Trading Card contest that ends on 7-25-07. So, I am inspired to make some more ATCs that I can trade on that same night. While searching the Internet for more inspiration, I spotted one of my cards on a familiar blog: http://kcatc.blogspot.com/2007_02_01_archive.html I am also starting to make ring-a-dings out of alternative materials. The picture on the left is my fist ring, let me know what you think.
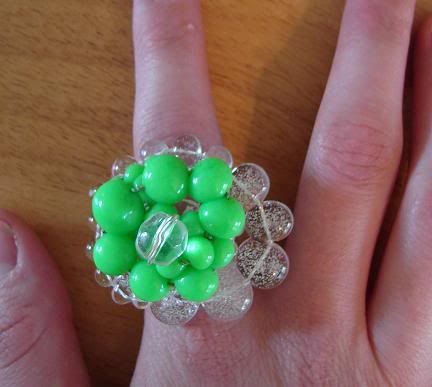
The picture below it is the side view. These are the projects that I am working on today.... I have at least 15 more in the bag that are started, close to being done, or just a thought. But a lot of those are going to have to wait. I have company that is coming in less than a month and my most important project of all is getting my house clean!
I enjoyed this project immensely!!! The above picture is the end result. The pattern was from the Louisa Harding Gathering Roses Accessories Collection and I used Artful Yarn in Candy. This is the second knitting pattern that I have ever followed and I loved the challenge. I loved it so much that I made my own pattern for an easier pair of fingerless gloves, which might be an Urban A+C's free monthly pattern (I will keep you all updated). On another note Urban A+C is having an Artist Trading Card contest that ends on 7-25-07. So, I am inspired to make some more ATCs that I can trade on that same night. While searching the Internet for more inspiration, I spotted one of my cards on a familiar blog: http://kcatc.blogspot.com/2007_02_01_archive.html I am also starting to make ring-a-dings out of alternative materials. The picture on the left is my fist ring, let me know what you think.
The picture below it is the side view. These are the projects that I am working on today.... I have at least 15 more in the bag that are started, close to being done, or just a thought. But a lot of those are going to have to wait. I have company that is coming in less than a month and my most important project of all is getting my house clean!
Monday, June 4, 2007
Big Chief
Wow, I have been busy!!! Consequently, I haven't been able to blog in a while. One of my recent projects is the "Big Chief". I was recently commissioned to paint a logo of sorts on a hit or miss engine from 1912. The original logo was a decal and because of normal wear and tear, and the fact that the engine is almost 100 yrs old, there aren't any Big Chief engines today that still have the original logo. So, I was provided with a drawing of a Native American Chief's profile and I modified the design to make it more of a logo and simplify it for a smaller size. I was painting with enamel so I also had to modify the design to accommodate the restrictions of the paint. The image on the right is a close up of the logo that I painted on the right side of the hopper. I painted a mirror image of the logo on the left side of the hopper, and I also painted the words "Big Chief" on the front.

The painting below is the engine assembled.
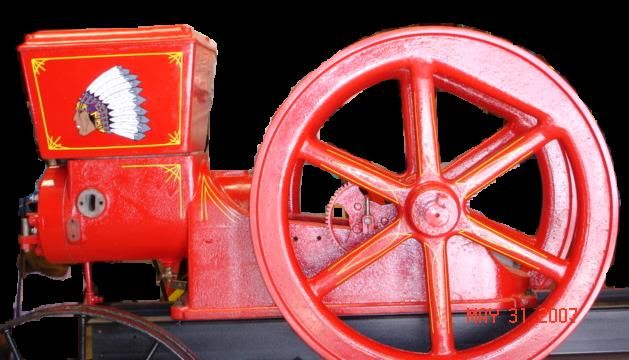
The design ended up being about 8" x 8", so that will give you some idea of the size of the entire engine. I must add that I did not do any of the pin striping!!! The pin striping turned out great and I knew that if I would have attempted that... it wouldn't have looked as good as it does. I am satisfied with the way the logo turned out... I would have liked to have spent more time with it, but I know that if I kept working on it I would never be done! This was the first time that I have ever really worked with enamel and I definitely had some trouble. In the end I think I pulled it off. I would like to work a little more with enamel, the only catch is that unless I learn how to airbrush, anything that I paint will be really flat. The paint does not mix at all and I am not sure that it would mix with any type of oil based medium.
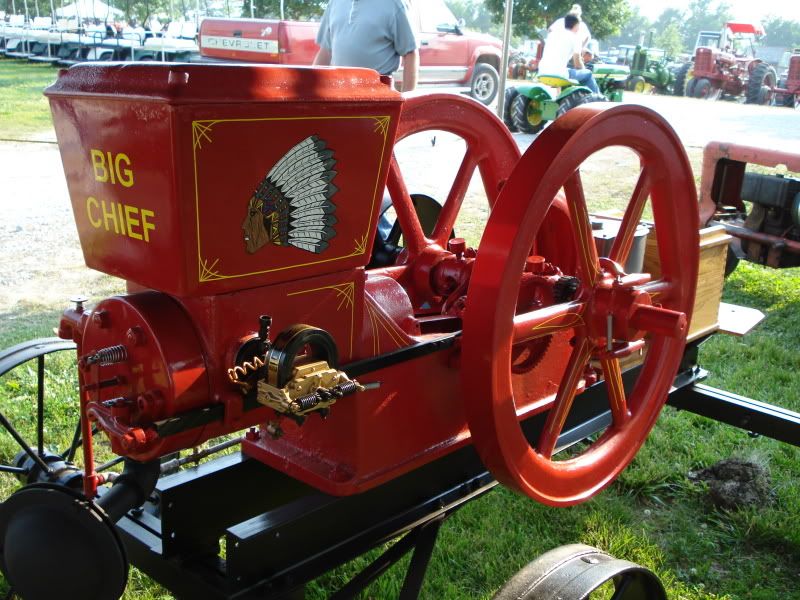
The painting below is the engine assembled.
The design ended up being about 8" x 8", so that will give you some idea of the size of the entire engine. I must add that I did not do any of the pin striping!!! The pin striping turned out great and I knew that if I would have attempted that... it wouldn't have looked as good as it does. I am satisfied with the way the logo turned out... I would have liked to have spent more time with it, but I know that if I kept working on it I would never be done! This was the first time that I have ever really worked with enamel and I definitely had some trouble. In the end I think I pulled it off. I would like to work a little more with enamel, the only catch is that unless I learn how to airbrush, anything that I paint will be really flat. The paint does not mix at all and I am not sure that it would mix with any type of oil based medium.
Tuesday, April 17, 2007
Work in Progress-Compulsive Fixation
I am working on my first instillation piece. I started working on this about a year ago and usually it would bother me if something was that slow going. But when I started working on this, I knew that it was an ongoing project and I accepted the fact that I would have to have a lot of patience in order to get this completed. Basically it is a shelf that houses my obnoxiously large collection of lip gloss. For some strange reason I have this crazy attraction to lip gloss, lip balm, or any kind of make-up that you apply to your lips that is not labeled as lipstick. And it isn't just about the actual lip gloss, but it is also about the container and the packaging. This is my first and only compulsive buy and since I think each of the lip glosses are art within them selves, I decided to put them on display so that everyone can see them the way that I do. The shelf is made of 1 1/2" x 1/4" strips of pine. I created a jig that has 6 different sizes/shapes which fits about 95% of all my lip gloss. I created each box individually using the jig and then I attached the boxes together to form a single shelf.
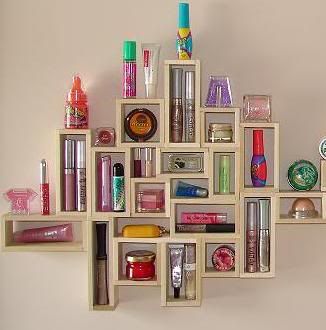
I then repeat the process to form more shelves. I don't follow a specific pattern when I attach the boxes so each shelf looks a little different. When I hang the shelves, I place them close together so that they look as though they could all be one continuous shelf (bottom). I have 3 shelves assembles at this point and I think I need about 4 more to hold all of my lip gloss. Once those are completed, I will sand the front surface of all of the shelves and finish them with maybe a little color and some sort of lacquer or varnish.
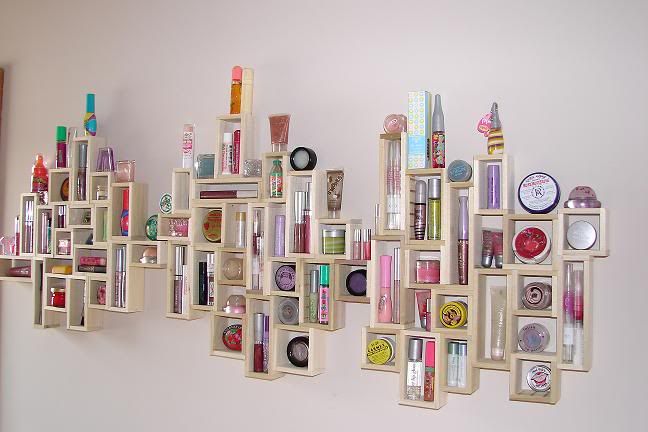
I then repeat the process to form more shelves. I don't follow a specific pattern when I attach the boxes so each shelf looks a little different. When I hang the shelves, I place them close together so that they look as though they could all be one continuous shelf (bottom). I have 3 shelves assembles at this point and I think I need about 4 more to hold all of my lip gloss. Once those are completed, I will sand the front surface of all of the shelves and finish them with maybe a little color and some sort of lacquer or varnish.
Wednesday, April 4, 2007
Work in Progress-Uncle's Portrait
I am currently working on a portrait for my uncle. I have been working on this painting for 7 months or so and I am having some trouble staying focused. It is almost completed and I would really like to send it to him, but I am unable to come up with something to fill the void in the center-right of the painting. I think that the problem is that I am trying to find a subject that has been a constant in his entire life and I don't know my uncle as well as I would like. Until something surfaces or I just end up calling him, this painting is going to stay the way that it is. The painting is 12" x 16" and it is acrylic on canvas. That is pretty small for me. But I have recently developed this "small painting initiative". My studio is a small spare bedroom in my house and because of the limited space and that I am unable to use caustic materials, I have decided to dabble on the smaller side. I have even started panting in water colors.
Tuesday, April 3, 2007
Past Work-Money in a Clothes Dryer Epilogue
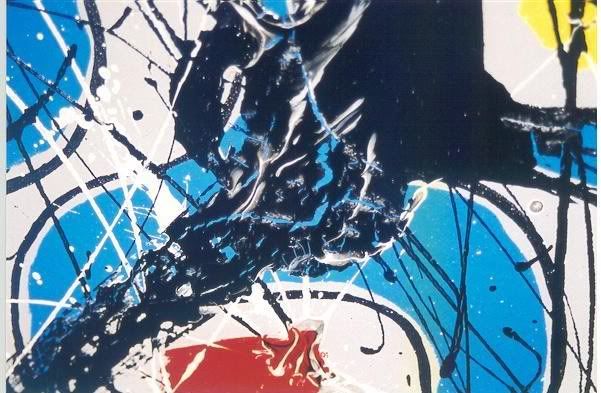
During my last year in college, I went through a Jackson Pollock stage. I started by painting in a style similar to his, where I laid a large piece of unstretched/unprimed canvas on the floor and proceed to splatter paint it. The finished work was horrible, but what I realized was that I liked how the wet paint interacted with the wet paint in different colors. So I started to produce smaller pieces that had a sense of depth before I introduced the splatter paint. When I did splatter the paint I did it sparingly and strategically to get my desired effect. My mother was showing some pictures of my spatter paintings to a late family friend and he commissioned me to paint him a painting. When I completed the painting, Money in a Clothes Dryer, I wasn't completely satisfied with the end result. I went a bit overboard with the splatter and it ended up more like a spill. So I painted, Money in a Clothes Dryer Epilogue (above right). In the end I liked the first painting better and that is the one that I sent him. Unfortunately I didn't get a picture of that first painting and even more unfortunate... my family friend, Donnie Rotten, passed away not long after he received the painting. The detail on the left shows an example of the paint interaction that intrigues me to this day. ( Money in a Clothes Dryer Epilogue 2004. Latex on canvas, apx. 18" x 24") I donated this painting to a local art auction to raise money for public television. I have no idea where it is now.
Monday, April 2, 2007
Past Work-Stevie
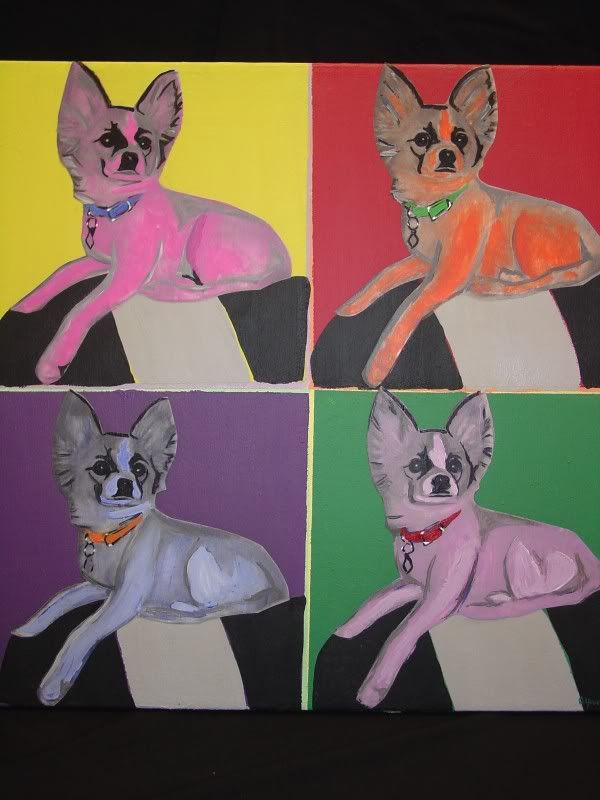
My standard wedding gift is a painting. I like giving my artwork because I think it is a bit more personal then a china set and whole lot more inexpensive!! I enjoy painting them because it can be a bit of a challenge and it is also nice to have someone to be inspired by. And believe it or not, I also like having a specific deadline. I am a huge procrastinator and this way I have something to guide my focus and fuel my drive. This is a painting that I did for my friend Jenny in 2004. This was her wedding present and it is a painting of her dog, Stevie. I call this my "screen print simulation". It is acrylic on canvas that I painted to resemble one of Andy Warhol's famous screen prints. I saw a picture in a magazine that was of Reese Witherspoon's home office. She had similar images of her dogs on the wall, which I am sure were actual screen prints or they could have been computer generated. This was my direct inspiration and I knew that it would be a perfect way to display Jenny's little "queen," Stevie.
The first of many
O.k. here it is. I am finally starting an art blog. Hopefully this is the first step to my obnoxiously lucrative art career. :) I also hope that this blog will encourage me to be more enthusiastic about my art. I haven't exactly been very inspired to create much art in the last 4 years (since I have been out of college). Maybe it isn't that I haven't been inspired but more that I haven't really had much time. The first 2 of those years I worked full time and the last 2 I have "worked" what seems like 4 full time jobs being a mom. I have recently picked up a part-time job on the weekends which so-far has provided me with a lot of inspiration but has taken away more of my non-existent free time. My New Years resolution, that I am just now making in April, is to create more art. The problem is that I seem to have ADD when it comes to my artwork. I am so much more interested in the technique and the process, that I seem to have little focus and drive to any one particular medium or style. Hence I named this blog the ADD Art Movement because who is to say that I have to conform to a specific style, authentic or not. Or that all of my artwork has to be created with the same medium? I don't want to just think inside the box and I don't want to just think outside the box. I want to think inside, outside, all around and far away from the box. And I want to be recognized as more than a remedial artist. I am aware that my lack of focus is one of my downfalls but instead of being inhibited by it I am going to embrace it.
Subscribe to:
Posts (Atom)